menu

Wednesday, January 29, 2014

Beauty 101: Facial Anatomy Breakdown for Beginners!

I know lots of my readers are very new to makeup. I remember when I was a sophomore and first really began to explore makeup, I would watch +Makeup Geek's videos (I can't believe I've been watching her videos for almost 5 years now!) and just be completely absorbed in her knowledge. This was the very first video of hers that I ever watched, because I had just joined colorguard earlier that year, and our school color was green. I remember watching her video and being so confused about some of the terminology she was using. What was a crease, what was an outer v, what was the waterline, and how the heck did you apply false lashes!? The only thing I knew was how to apply eyeliner (horribly, I might add), and mascara. Of course, as I explored more into the beauty world, I discovered what each part of the face was, and it helped my application immensely. So here we go!


A. Outer Corner or Outer V. Typically where a dark color is applied to add definition, the outer corner or outer v is a sideways v-shaped pocket on the outer edge of your eyelid. Applying a darker color here can give the illusion of wider set eyes. 
B. Crease. The crease is exactly what it sounds like -- it's where your eyelid creases. This is where the eyeball and the brow bone meet.You will often see that darker colors are applied here to add dimension and to create the appearance of a deeper crease. Some eye shapes (such as monolid eyes) don't have a defined crease.
C. Inner Corner. The inner corner can sometimes be incorrectly called the tear duct. The tear duct is a fleshy pink fold inside your eye, and it's best to avoid getting product there. However, your inner corner, which is the skin around your tear duct, is often highlighted to create a brighter, more youthful appearance.
D. Brow Bone. The brow bone where your eyebrow sits, also known as the superorbital ridge. It separates the frontal bone (the forehead) from the eye socket. The skin around the brow bone is often lighter than that on your lid, but it  is often highlighted to add dimension and to create the illusion of cleaner brows.
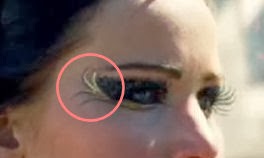
E/F. Upper and Lower Lashline. The upper and lower lashline is where your lashes grow. You could consider them the garden for your lashes. When dark eyeliner is applied to the upper or lower lashline, it can create the illusion of thicker, fuller lashes.


G. Hollow of the Cheek. The hollow of the cheek is underneath the cheekbone, and can most easily be found by sucking in the cheeks or making a fish face. By using a darker shade in the hollows of your cheeks, you can make your cheekbones look more defined, and it can also give a slimmer look to your face. 
H. Orbital Bone or Orbital Socket. The orbital bone, or, more appropriately, the orbital socket, is a collection of bones that create the eye socket. If you think of a skull, it is where the eyes of the skull would be. The orbital socket is made up of seven bones, but primarily the frontal bone (forehead),the lacrimal bone (which is separates the two orbital sockets), the zygomatic bone (cheekbone), and the ethmoid bone (which is behind the nose, and separates the nasal cavity from the brain). The only two bones that make up the orbital socket that you really need to know are the brow bone and the cheekbone. 
I. Jawline. The jawline is the line created by the lower jaw, and starts where the upper and lower jawbones meet. A "strong" jawline will be more square, while a "soft" jawline will be more rounded. You can change the shape of your jawline by highlighting and contouring. 


J. Apple of the Cheek. The apples of the cheeks are the fattiest part of the cheek, which can most easily be found when you smile. They become more rounded and noticeable when you smile, and it is the part of the face that the old lady at the supermarket used to pinch when you were little.
K. Side of the Nose. The side of the nose is the downward angle created by the bridge of the nose, as well as the nostrils. For a slimmer looking nose, you can apply a darker contour shade along the sides of the nose.
L. Bridge of the Nose. The bridge of the nose is created by two smaller bones. Think of it as the peak to the mountain. Some people have ridges or bumps in the bridge of their noses, while others have smooth bridges. It typically starts between your eyes, and ends at the tip of your nose.
M. Waterline. The waterline, or the tightline, is the fleshy section of your eye area that separates the lashline from the eyeball itself. It can be lined with a dark color for a smokier, more dramatic effect, or with a nude or white color for an awakening effect. Only use waterproof pencils or waterproof gel liner in the waterline, otherwise you will end up with a goopy, blurry mess (if you've done it, you know exactly what I'm talking about)!

The one thing I forgot to add to these photos was the Cupid's Bow. The cupid's bow is found on the upper lip, where your lips peak and fall. If turned sideways, it looks just like a hunting bow!

I hope this helps all you beginners out there!

- d.

p.s. Don't forget to enter my giveaway! It ends February 5th! 

Saturday, January 25, 2014

Quick Update: I Chopped My Hair Off!?!

For those of you who follow me on Tumblr, you already know! Last night, I finally got completely sick of my hair. I had been trying to grow it out, because I have done some serious damage with all the coloring I do to my hair. I was so frustrated with it, and it was at this weird length that I wasn't loving. I wasn't even liking it. I was just tolerating it. I don't feel like you should ever just "tolerate" something as personal as your hair! So last night, I made an appointment at a San Diego-based Aveda salon called Gila Rut. I had never been there before, but I had heard such great things about it that I decided to try it out!

I have never had such an amazing salon experience as I did last night. When I first walked in, I told them I had booked an appointment online, and after checking in, I was offered water or tea. Then, I was given a tour of the salon, which smelled strongly of essential oils. They showed me a changing room and gave me a smock. In this changing room, they had hangers for you to put your clothes, so that you didn't get any hair on them. After coming out in my smock, I was told that I got to choose two complimentary services. There were four choices: a neck and upper back massage, a hand and arm massage, a mini-facial, and a makeup touch-up. Since I was just going home, and I'm very particular about what I use on my face, I chose the massages. After this, I was shampooed, cut, and styled!

I used this photo from Pinterest as a reference photo, and I think that the stylist did a fantastic job. I've had my hair cut like this before, about two years ago, and I loved it. I think I love it even more this time around! I don't know if all Aveda salons are like this one, but I will definitely be checking out more.


- d. 

p.s. Don't forget to enter my giveaway! It ends February 5th! 


Thursday, January 23, 2014

Like GlamGlow, But Better!

If any of you are religious beauty YouTubers like I am, you've probably heard of the GlamGlow SuperMud Clearing Treatment. There is so much hype going on about this product, and of course, I just had to try it for myself.


Many, many samples later, this is what I've found:

This mask has many different alpha hydroxy acids and beta hydroxy acids, as well as kaolin and charcoal to pull out the toxins and oils in your pores. You can actually see the spots on your skin where it's pulling out the sebum! Alpha hydroxy acids and beta hydroxy acids really help your cell turnover, and slough off all the dead skin cells that cover up your beautiful, new skin. It leaves your skin looking healthy and glowing, and the results were noticeable the moment I washed off the mask. The texture of my skin was very soft and tight, but not uncomfortable, and any active blemishes appeared smaller and less inflamed than before. GlamGlow has a great sample pack, for only $11.99, that allows you to try out three of their products. I've used it a few times now, and the results are consistent with each use.

Now, as I was looking at the ingredients, one major thing that stuck out to me was, uh, sodium hydroxide. Which seriously makes my skin crawl. Sodium hydroxide is also known as lye. It is also the 4th ingredient on the list, only after water, kaolin, and magnesium aluminum silicate, which is a product thickener and essentially just a filler. If you didn't know, the order in which the ingredients are listed is based on how much of that ingredient is in the product. Therefore, there is more water than any other ingredient in this mask.

The point I'm trying to make is that there is a pretty substantial amount of sodium hydroxide in this mask. Sodium hydroxide can be extremely dangerous if not used with caution. It is a primary ingredient in many detergents, drain cleaners, etc, and, when mixed with water, can be used to decompose animal and human corpses (or for a more scientific source, click here). Now, sodium hydroxide could be a good thing, as it could easily dissolve a few top layers of skin. But that makes me wonder. Is that what makes this "miracle product" a miracle? To burn off the top couple layers of skin would bring forth new, refreshed skin, and with the addition of a ton of alpha hydroxy acids and beta hydroxy acid, as well as pyruvic acid (used for skin lightening), this is an overnight success story. You will see results instantly. However, I honestly can't imagine this being great for long-term use, especially with limonene, linalool, and benzyl benzoate packed in there simply to make it smell better. I almost  I figure that this is just a fad that will go as quickly as it came, especially with an incredibly high price tag of $69 for 1.2 ounces.

Now, onto my solution for my GlamGlow problem!


Origins Clear Improvement Active Charcoal Mask. I am in love. This mask is so incredible. Origins has the slogan "Powered by Nature. Proven by Science," which drew me in. I am a sucker for natural ingredients in skincare products, and I have only heard good things about this brand. They recently had a tiny sample size of this mask as a 100 point perk at Sephora, and as soon as I saw it, I knew I had to try it. As soon as I tried it the first few times, I wanted more. I am definitely going to repurchase this once my deluxe sample runs out! That being said, you don't need a lot of product. I've used my small 1 oz sample at least 3 or 4 times now, and I'm pretty sure I still have enough for one more use. It runs at $24 for 3.4 ounces, which is a third of the price and three times the size of GlamGlow.

For me, it does the same thing as GlamGlow -- naturally. The ingredients list for this product is about half the size of the list for the GlamGlow mask, and I actually recognize most of these ingredients. There are four clays in this mask: kaolin, bentonite, montmorillionite, and of course, charcoal. Each of these clays is used to suck the toxins and oils from your pores, and montmorillionite is actually used to treat contact dermatitis. This mask also has an antioxidant called lecithin, which is found in all living organisms, and is a great moisturizer. The most "bizarre" ingredients I found in this product are the ingredients that keep the product from separating, none of which are really that scary.

Something that actually completely shocked me is that it is appropriate for different skin types. I have dry-combination skin, with patches of psoriasis, and since using this mask, I have noticed my psoriasis actually decreasing and the balance returning to my skin. Most masks like this just irritate my psoriasis and make it flare up, and make my dry patches even drier. My boyfriend, who has oily-combination skin, found that he had similar results. To him, it felt like the GlamGlow mask. For example, he could feel the tingling, like the sebum was being pulled out of his pores, just like the GlamGlow mask does! He also found that his skin felt fresh and tight (but not uncomfortable) after washing this mask off.

Product smackdown?


Don't get me wrong. I'm not trying to sit here and bash one mask while praising another. If you like GlamGlow, and it works for you, more power to you! But I honestly can't comfortably recommend using that product long-term or daily, despite the "use as often as needed" direction on the packaging.

Final thoughts: GlamGlow? Not worth the hype. Origins Charcoal Mask? YES!

- d.

p.s Don't forget that there is still plenty of time to sign up for my Catching Fire giveaway!

a Rafflecopter giveaway

Sunday, January 19, 2014

Johanna Mason's Interview Look + Giveaway!

So now we've come to the final look of the series! This makeup is from the scene when Johanna cusses out the Capitol citizens. She is so gutsy! 


This look was so much fun to do! I primarily used my Too Faced Chocolate Bar Palette for this look. 


I first started out with an eyeshadow primer. Any primer will do, just something that will really hold onto the pigment. Then, I took the gold color, Creme Brulee, and packed this all over my lid and onto the orbital bone, but not quite all the way to my brows. I wanted to leave an empty space for the highlight color. I did this in a rounded shape. I also applied this color along my lower lashline and smudged it out.

Next, I took Milk Chocolate, which is a cool-toned light brown, and placed this on the orbital bone, into the crease. I also blended this color along the sides of my nose, near the brow, to create dimension. Jena Malone's makeup artists really love to accent her gorgeous bone structure this way! I used a fluffy domed shadow brush for the Milk Chocolate color. 

I then took an angled brush and Triple Fudge, and filled in my brows. I have very sparse brows, so this was a necessary step for me, but if you have great brows like Jena Malone, feel free to skip this step! I took a spoolie and blended out the brow color. I also took this same dark brown color and angled brush and lined my upper lashline, using a pencil brush to add a smoky effect. Then, I took White Chocolate under the brow. 


From here, I moved onto the face, using the same products I have used in every look I do, which you can find in any other makeup look or face of the day post! I also took Milk Chocolate on a fluffy domed brush and contoured my cheeks, as well as my nose. Milk Chocolate is a great contour shade, especially for really precise application. I used "Strawberry Bon Bon" from the Chocolate Palette as my blush. I then applied a light coat of my Maybelline The Mega Plush Volum' Express Mascara. I ran a clean spoolie through my lashes to ensure that it was a very light coat. 


Now moving onto the most important part of this look: the lashes! I bought these lashes from Elegant Lashes, and they are the exact style used in the movie. I simply applied my Duo Eyelash Adhesive in "Clear" to the band, let it sit until it was tacky, then placed them underneath my lower lashes. Don't worry if you can see the band. This look isn't supposed to be natural, despite the fact that she's a tree. ;)


For the lips I actually used a cream shadow, which was the Rimmel Scandaleyes Eye Shadow Paint in "Golden Bronze." I used a lip brush to neatly apply it, and I was done!


Now for the big surprise I keep talking about! 

I seriously have had so much fun doing this series, and I have gotten such positive feedback from it. So I wanted to give back to all of my followers! I have decided to do a GIVEAWAY!!! 


For this giveaway, there will be two winners. Each winner will receive a fun Catching Fire prize pack! 

I will be giving away the CoverGirl Catching Fire Limited Edition Nail Polish in "Seared Bronze," as well as the Nail Stickers in "Tawny Flame." I used both of these products in my last Katniss look (but don't worry, you'll be getting these products brand new and still in the packaging). The winners will also receive a brand new pair of lashes, just like the ones I wore in this post, as well as a replica Mockingjay pin! 

So here are the rules:
  1. This giveaway is international! I will be choosing two winners at random via Rafflecopter.
  2. If you are under 18, please get your parent or guardian's permission before entering this giveaway.
  3. This giveaway will end on February 5th, 2014, at 12 AM, PST.
  4. You MUST leave a comment below explaining why you want to win this prize pack. You will only receive one entry for this. Multiple posts will not grant you multiple entries.
  5. You may tweet about the giveaway once per day. For each tweet per day, you will receive one entry.
  6. You may follow me on Instagram! You will receive one entry.
  7. You may reblog this post on Tumblr! One reblog per day will get you one entry per day. 
Use the Rafflecopter widget below to ensure that your entries count!

a Rafflecopter giveaway

Good luck! And may the odds be ever in your favor...

- d. 

Friday, January 17, 2014

Too Faced Chocolate Bar Palette Review

If I'm being honest, this post has not been planned at all. I have a list of ideas for blog posts, and I generally know what I'm going to do or say. But I have been eyeing this palette for a while now, ever since they began to advertise it on the Too Faced website, and while in Sephora yesterday, I caved. I just had to have it!


As of right now, this palette is sold out on the Too Faced website, but it can be purchased at Sephora and Ulta! It retails for $49. In this palette, you get 16 chocolate-inspired shadows. Like the other chocolate products that Too Faced is known for, the shadows in this palette are made of pure cocoa powder, which you can smell when you open it up. It isn't overpowering, but it's definitely there. It has 6 matte shades, and 10 shimmers.


First things first: the packaging. This palette is beautiful to look at! The packaging is metal, and the mirror seems sturdy. It's compact, it's sleek, and easy to fit just about anywhere. I have one major beef with it though. It has a weak magnetic closure. Usually, I don't mind magnetic closures. I mean, I love my Inglot palettes! But this magnet in this palette isn't enough to keep it closed, and it could easily open up and get ruined if not properly stored. 

Another flaw in the packaging is that the names aren't on the palette. It comes with a little plastic cover that has the names on them, but after taking and labeling the photos of the product, I don't even remember where I put it.

So how are the shadows themselves? 


Gilded Ganache: This shade is a cool brown, with gold and bronze microglitter. Not much to say about this shade. Good color payoff, and the glitter is definitely noticeable.

Salted Caramel: One of the smoother (if not the smoothest) matte colors in this palette, Salted Caramel would make a fantastic blending shade. It's a warm light brown, very comparable to Urban Decay's Naked shadow.

Hazelnut: This is a gorgeous bronze shadow, which reminds me of a less shimmery version of Urban Decay's Smog. It's very smooth, and has great color payoff.

Marzipan: Probably one of my favorite shades in this palette, and I know I'm going to use it a ton. It's a shimmery light pinky peach shadow that would be great as an all-over lid color.

White Chocolate: This is a matte, creamy off-white shade. This would be a great blending or highlight shade for anyone with fair skin. It's not chalky, but it's not incredibly smooth either. It also tends to grab when applied.

Creme Brulee: This a very true, cool-toned gold color, with lots of shimmer. It's incredibly smooth and pigmented.  

Semi-Sweet: This is the warmer-toned brown in the palette. It's like if the color "brick red" had a cousin named "brick brown." Initially, the color payoff isn't great, but it definitely builds well.

Haute Chocolate: This is a pinky brown shimmer. I'd compare it to a shiny new penny. It's smooth and pigmented, and really easy to apply.


Milk Chocolate: This is the cool-toned counterpart to Salted Caramel, and totally comparable in texture. It's a cool, matte light brown and a great blending shade. 

Strawberry Bon Bon: This cool baby pink shade is probably the most disappointing shade in the entire palette. First of all, it seems a little out of place. It's also the chalkiest shadow in the palette, and the color payoff could be described best with a "meh" and a shrug. 

Cherry Cordial: I guess this is considered a shimmer, but it's more like a matte brick red shadow with multi-colored microglitter. The color payoff is okay, but it can definitely be layered and built up to a deep brick red color.

Black Forest Truffle: This color is insanely glittery. It is a deep wine color, with TONS of silver and bronze glitter. It's also very pigmented, and you don't have to completely pack it on to get the glitter to show up.

Candied Violet: This is a really pretty cool-toned purple shimmer. Really great pigmentation, with lots of pink and green duochrome microglitter. It applies very smoothly. 

Triple Fudge: This is the cool-toned counterpart to Semi-Sweet! Definitely a great crease color, and, like Semi-Sweet, it builds well.

Amaretto: This shade sucked me in the moment I saw it. I love bronze colors like this one! It's incredibly shimmery, and applies smoothly, with great color payoff. 

Champagne Truffle: This would be a fantastic inner corner highlight shade. It is smooth and very shimmery, and would also be great to layer on top of other colors to add some extra shine. 


I think that Too Faced did a fantastic job balancing cool and warm tones in this palette. A couple of the matte shadows are hit-or-miss, but the shimmery shades are really smooth, pigmented, and all of the shadows are easy to blend. 

I love that this palette has a great variety. While it is definitely a neutrals palette, it also has some lovely shades to add a pop of color. This is a "complete" palette, meaning that you could easily create a look using just this palette. It has some great mattes for blending, and the looks you could create with this palette are endless! Many of the shades are comparable to many of the shadows found in Urban Decay's Naked palettes, and this is a great response from Too Faced to all of the Naked 3 hype.

Final Thoughts? This is definitely a palette I will find myself using often, especially for travel. Unfortunately, I think I will probably have to tie a rubber band around it to ensure it stays closed, but it is sleek and doesn't take up much room. It is a versatile palette, yet still basic enough for beginners! For all that you get, I certainly think it's worth the $49 price tag.


- d. 

Tuesday, January 14, 2014

Top 5 Tips for Managing Dry Skin This Winter!

Here in sunny California, I don't feel the effects of the winter as harshly as many people do. However, I have had my share of white Christmases, and I know that dry skin can be a battle! Not only do I normally have dry-combination skin, but I also have a skin condition called psoriasis, which only gets worse in the cold weather. Here are my top 5 tips for managing dry skin!
5. Moisturize.
While using lotion may seem like a big "duh" to most people, you would be shocked at how many people forget this step in their routine. Find a lotion that works for you. Personally, I try to avoid any kind of scented lotions (except my Soap & Glory Hand Food, but I just can't get enough of that stuff!), because I often find that it just irritates my skin and leaves it more dry than before. Bath & Body Works lotions especially tend to do this, unfortunately. Do your best to avoid mineral oil as well, as it creates a barrier between your skin and the outside world. You want to protect your skin, not suffocate it! Coconut oil is also a great natural moisturizer. 
4. Take a bath.
One of my favorite ways to help moisturize my skin is by relaxing in a nice warm bath. However, not just any kind of bath! I love to mix extra virgin olive oil and apple cider vinegar into my baths. They are incredibly cheap options and leave your skin feeling silky. If you really want a luxurious, moisturizing bath, look for a buttery bath melt or bath bomb. My absolute favorite is Lush's Butterball, but you can find products like this just about any place that sells bath supplies.
3. Exfoliate.
You are covered in dead skin cells. Sounds gross, right? But that's just how your skin works. The average person has about 15-20 layers of dead skin cells on their body. So you can moisturize all you want, but how much of that product is actually effectively moisturizing your skin? Exfoliation can help encourage cell turnover, which will help reveal beautiful, glowing skin. Don't over-exfoliate though. You don't want to rub yourself raw! 
2. Eat raw fruits and vegetables. 
A balanced diet is key for beautiful skin. In the winter time, raw fruits and vegetables tend to go unnoticed, since they are often a summer time treat. Keep them in your diet year-round. Raw fruits and veggies are loaded in antioxidants and vitamins, which will help keep your skin healthy and bright. Raw fruits and veggies are also generally better for you than cooked fruits and veggies, because cooking often destroys most of the nutrients and enzymes in your food. 
1. Drink WATER!
I cannot stress this enough. Water is your best friend. Water not only hydrates you, but you are made of it! Two-thirds of your body is made up of water. Needless to say, it's pretty important. Caffeine in coffee, tea, energy drinks, and sodas will dehydrate your body. Switch out at least one sugary drink per day for water, and you'll see a difference!

Remember, beautiful skin starts from the inside. You can use thousands of dollars worth of products, and never see a real, long term difference. These tips are not only for use in the winter, but year-round. Keep in mind that your body is a temple, and you only get one of them, so treat it right and it will thank you!

- d.

p.s. If any of you follow me on Tumblr, you'll know that my best friend, Christine, is running for Miss San Diego! Being a part of the Miss America organization, Christine is supporting local children's hospitals, and is raising money for the Children's Miracle Network. On top of that, for every $10 she raises, she and her mom will make a scarf that will be donated to the homeless, which can help make the difference between life or death this winter. Let's help make miracles happen! Click here to donate. 


Saturday, January 11, 2014

Katniss Everdeen's Tribute Parade Look

Now we're back to the Catching Fire mini-series! We're almost done, just one more look, and in the next post, I have a surprise!

This is the look Katniss wears in her second tribute parade, before entering the arena for the Quarter Quell.


Jennifer Lawrence's makeup artists definitely didn't hold back on the glitter in this movie. It looks like it's a pretty chunky black and gunmetal glitter on her eyes, and a gorgeous gold liner, almost like feathers.


Despite being fairly simple, this look is very messy, and I made sure to keep cotton swabs and makeup remover on hand at all times. To create a solid base for the black shadow, I took a Milani Liquid Eye Eyeliner Pencil in "01 Black" and created the shape I wanted for my lid. I took it up through the crease, being very particular about where I placed the product. I used my finger to blend the cream color out, then I took a matte black shadow and a flat shader brush and pushed the color into the liner, to prevent fallout. 


After I placed the color, I took a cotton swab and some makeup remover and went along the edges to clean up any fallout, and to create a crisper edge. Next, I took a gunmetal cosmetic glitter from Claire's and, using the same flat shader brush, I pressed this into the black shadow. I held a tissue under my eyes to prevent the glitter from getting everywhere. 


Now comes the hard part. I took NYX Loose Pearl Eyeshadow in "Yellow Gold" and mixed it with a spray of my Mac Fix+ to create a paste. I used this for the feathery strokes along the outside of the eye. I took a precision liner brush and very carefully and quickly drew in the strokes. I also took this wet shadow under the lower lashline, stopping at the inner corner. Before the product completely set, I took the loose shadow, dry, and patted it over the wet shadow to brighten it up. 


I completely forgot to take a picture of this next product, but if you've been keeping up with this mini-series, you'll recognize the product from Johanna's Tribute Parade Look. I wiped off my precision liner brush and took my Maybelline Eye Studio Lasting Drama Gel Liner and carefully lined the accent points on the feathery strokes.


After I accented the feathers, I again took my Milani Liquid Eye Eyeliner Pencil and lined my upper and lower waterline, as well as my lower lash line. Finally, I applied a pair of generic eBay lashes, like I did in my last Katniss look.

I used Rimmel Professional Eyebrow Pencil to fill in and straighten out my brows, much like Jennifer Lawrence's.This brow pencil is great for on-the-go because it comes with a brow brush on the cap! I highlighted the browbone with my MAC Studio Finish Concealer in NW25 (which actually isn't even the right color for me, but it works well for this step). 

From here, I did my face, layering my foundation for a more flawless finish. On the cheeks, I used my trusty Inglot 358 Matte as a light contour, and the mauve-toned blush from my Morphe 10 Color Blush Palette. Since her lips look pretty natural, I simply applied my Jack Black Intense Therapy Lip Balm


For this look, I decided to do something a bit different, and do some Katniss inspired nails! 


For this manicure, I used a gorgeous berry color on my nails, which was Revlon Nail Enamel in "Bewitching." On the accent nail, I used a polish from CoverGirl's Limited Edition Capitol Collection, which is called "Seared Bronze." I got this polish in a pack with the nail stickers in the style "Tawny Flame," which I also used on my nails for this look. I was actually quite impressed with this bronze polish from CoverGirl. The glitter was gorgeous and it was so opaque! It looks especially amazing in natural sunlight.


- d. 

Monday, January 6, 2014

Notable Products of 2013!

Happy New Year, everyone! I know this post is a bit late, but I finally got around to gathering up my favorites (and one major disappointment!) of 2013. There's quite a bit to talk about here, so let's jump right in!

Best Hair Product


Tangle Teezer The Original Pink Fizz. This is no ordinary hairbrush. For those of you who haven't jumped on the Tangle Teezer bandwagon, do it ASAP! I have straight, fine hair, that tangles like mad. I'm not entirely sure why it gets tangled so quickly, because most people with my hair type don't have that problem. I also have a skin condition called psoriasis, which I have on small parts of my scalp, so brushing out tangles can become painful since this condition makes my scalp much more sensitive. I have also noticed that my hair has become significantly healthier and less prone to breakage since purchasing my Tangle Teezer!

Best Nail Product


Revlon ColorStay Longwear Nail Enamel Base Coat and Top Coat. When used together, this drugstore duo gives my polish a long, happy life. I use these two polishes no matter what color I'm using, and it helps prolong the wear significantly. As I've said many times, I am very hard on my nails, and I often end up with chipped polish, which is one of my biggest pet peeves. Most of the time, because it bothers me so much, I just don't bother with nail polish. But this year I discovered this Base and Top Coat pair and I will never go back. I have tried Seche Vite, which seems to be a cult favorite, and I couldn't handle paying $6 for a top coat that became goopy and unworkable in just a couple of months. For just a couple dollars more, I could get both a great top coat AND a base coat, which also helps to prevent staining!

Best Brow Product


Inglot 358 Matte Shadow. This product should be no surprise! I discovered Inglot about 2 years ago, and fell in love. Depending on the finish, each Inglot shadow is 2.3 grams to 3.2 grams of product, for only $6 a piece, with comparable selection and quality to MAC shadows, which are 1.5 grams for $10 a piece. A total steal! More specifically, this matte taupe shadow is great for brows, as well as in the crease or as a face contour. I pretty much use this product for everything. I have naturally ashy almost-blonde but almost-brown hair, so this is a perfect shade for me, especially with my current hair color.

Best Face Product


Benefit Watt's Up! Cream Highlighter. I loved this product this year. I got it with my Beauty Insider birthday gift back in May, and I absolutely love it! It isn't shimmery, and it isn't greasy. It creates the perfect glowing effect without making you look oily. It's a beautiful golden tone, which adds warmth to your face. Being as fair skinned as I am, I definitely need some warmth. And it lasts forever! I've had the little deluxe sample size since my birthday and I've still got more product left. But I know that I'm definitely going to be repurchasing the full size in 2014!

Best Eye Product


Rimmel London Scandaleyes Waterproof Kohl Kajal Eyeliner -- "Nude." This is a total must-have in my collection. I discovered this product this year, after hearing +Fleur DeForce rave about it. I was in the market for a great nude liner, and I couldn't find any in the drugstore, until I heard about this one! Being half Chinese, I inherited my mother's smaller, almond-shaped eyes. They can easily be overwhelmed with lots of dark shadows, but this liner helps to make my eyes pop no matter what kind of makeup I'm wearing! And it's definitely great if you didn't get much sleep and you want to look more awake.

Best Lip Product


Jack Black Intense Therapy Lip Balm. I debated whether or not to include this product in this post for quite some time, because I discovered it so late in 2013. I had heard lots of people talk about this lip balm, but I had never tried it myself. When I began working at Sephora, I saw this product on the shelves in the men's skincare section. Finally, I caved in and purchased it on a day when my lips were excessively dry, due to the sudden strange weather change we experienced here in San Diego. I don't think I could ever go back to another lip balm. It leaves my lips feeling so soft and smooth, and doesn't make me feel like my lips are drier than ever before, like many lip balms tend to do (I'm looking at you, Chapstick and Burt's Bees). It's incredible! I have noticed that since using this lip balm, any color that I apply to my lips goes on so much more smoothly. It's $7.50 and worth every penny.

Best Makeup Brush


Real Techniques by Sam & Nic Chapman Expert Face Brush. This brush gives me a flawless face every time. I love using this to apply foundation, or for buffing in concealer. I got it at Ulta earlier this year, and I have completely fallen in love! I have used many different kinds of brushes for foundation, from flat brushes to stippling brushes, and I have found that this brush is amazing for just about anything. It's great because it is dense, and the shape of it makes it so that you can get into all the little nooks and crannies in your face. And it leaves you with an amazing airbrushed finish! 

Biggest Surprise of the Year


Aussie Moist 3 Minute Miracle Deep Conditioner. I love this conditioner. Last January, I bleached my hair in order to dye it a bright gingery orange. Big mistake. I completely destroyed my hair. I felt so awful, and my hair became very difficult to manage. I was complaining about it on Tumblr one day, when a friend of mine suggested Aussie's 3 Minute Miracle! Back when we were in high school, I think our senior year, she bleached her hair. It looked amazing on her, but she told me that this is what she used to keep it looking healthy! Needless to say, she was totally right. It's super cheap at about $3 a bottle, and I have found that it works better than even some expensive deep conditioners I have tried. My hair is so thankful!

Biggest Disappointment of the Year


Benefit They're Real Mascara. Such a crazy choice for my biggest disappointment, right!? I feel like one of the few people who didn't absolutely fall in love with this mascara. I also received this for my Beauty Insider birthday gift, and I was just so unimpressed by it. At first, I thought I really liked it. But the more I wore it, the more I felt like I was wearing spider legs on my eyelashes. Just everything about it felt bad. It was so difficult to remove that I felt like I was ripping out my lashes. It clumped on me so badly, no matter how I applied it. It also made my eyes incredibly itchy. I tried so many different ways to make this mascara work for me, and I just couldn't do it. I'm so sad to say I don't love this mascara, but I really, really, REALLY don't love this mascara. And at $23 a tube? I'd rather get a great Maybelline mascara from the drugstore for a third of the price.

Most Used/Loved Product of the Year


Tangle Teezer The Original Pink Fizz. Yes, I know this already won under the hair product category, but I honestly could go on forever about how much I love this thing. I was trying to avoid repeating products, but I couldn't help myself. I use this brush every single day, multiple times a day, and my hair has certainly benefited from it. I have never cared much about the kind of brush I use, until I discovered the Tangle Teezer. If you have yet to try one out, I promise you, it will be worth every penny. I've had nights where I was just insanely stressed out and my head was hurting, and +Andrew would sit down with me and brush my hair with this brush. If he had used any other brush or his fingers, it would have just pulled my hair and added to my headache. But instead, it soothed me and put me to sleep! I would be a total, tangled mess without it!

That's it for my Notable Products of 2013! I hope you all have had a wonderful start to the new year, and I hope it just keeps getting better from here.

Keep an eye out for my next post! I'll be continuing on with my Catching Fire series very soon, and I have an awesome surprise!

- d.