menu

Showing posts with label dramatic eye. Show all posts

Saturday, January 11, 2014

Katniss Everdeen's Tribute Parade Look

Now we're back to the Catching Fire mini-series! We're almost done, just one more look, and in the next post, I have a surprise!

This is the look Katniss wears in her second tribute parade, before entering the arena for the Quarter Quell.


Jennifer Lawrence's makeup artists definitely didn't hold back on the glitter in this movie. It looks like it's a pretty chunky black and gunmetal glitter on her eyes, and a gorgeous gold liner, almost like feathers.


Despite being fairly simple, this look is very messy, and I made sure to keep cotton swabs and makeup remover on hand at all times. To create a solid base for the black shadow, I took a Milani Liquid Eye Eyeliner Pencil in "01 Black" and created the shape I wanted for my lid. I took it up through the crease, being very particular about where I placed the product. I used my finger to blend the cream color out, then I took a matte black shadow and a flat shader brush and pushed the color into the liner, to prevent fallout. 


After I placed the color, I took a cotton swab and some makeup remover and went along the edges to clean up any fallout, and to create a crisper edge. Next, I took a gunmetal cosmetic glitter from Claire's and, using the same flat shader brush, I pressed this into the black shadow. I held a tissue under my eyes to prevent the glitter from getting everywhere. 


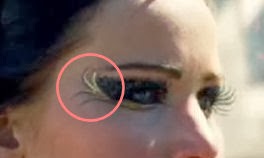
Now comes the hard part. I took NYX Loose Pearl Eyeshadow in "Yellow Gold" and mixed it with a spray of my Mac Fix+ to create a paste. I used this for the feathery strokes along the outside of the eye. I took a precision liner brush and very carefully and quickly drew in the strokes. I also took this wet shadow under the lower lashline, stopping at the inner corner. Before the product completely set, I took the loose shadow, dry, and patted it over the wet shadow to brighten it up. 


I completely forgot to take a picture of this next product, but if you've been keeping up with this mini-series, you'll recognize the product from Johanna's Tribute Parade Look. I wiped off my precision liner brush and took my Maybelline Eye Studio Lasting Drama Gel Liner and carefully lined the accent points on the feathery strokes.


After I accented the feathers, I again took my Milani Liquid Eye Eyeliner Pencil and lined my upper and lower waterline, as well as my lower lash line. Finally, I applied a pair of generic eBay lashes, like I did in my last Katniss look.

I used Rimmel Professional Eyebrow Pencil to fill in and straighten out my brows, much like Jennifer Lawrence's.This brow pencil is great for on-the-go because it comes with a brow brush on the cap! I highlighted the browbone with my MAC Studio Finish Concealer in NW25 (which actually isn't even the right color for me, but it works well for this step). 

From here, I did my face, layering my foundation for a more flawless finish. On the cheeks, I used my trusty Inglot 358 Matte as a light contour, and the mauve-toned blush from my Morphe 10 Color Blush Palette. Since her lips look pretty natural, I simply applied my Jack Black Intense Therapy Lip Balm


For this look, I decided to do something a bit different, and do some Katniss inspired nails! 


For this manicure, I used a gorgeous berry color on my nails, which was Revlon Nail Enamel in "Bewitching." On the accent nail, I used a polish from CoverGirl's Limited Edition Capitol Collection, which is called "Seared Bronze." I got this polish in a pack with the nail stickers in the style "Tawny Flame," which I also used on my nails for this look. I was actually quite impressed with this bronze polish from CoverGirl. The glitter was gorgeous and it was so opaque! It looks especially amazing in natural sunlight.


- d. 

Tuesday, December 10, 2013

Face and Nails of the Day -- Dramatic Cut Crease, Vampy Lips, and Nails on Fire.

Happy Monday!

Today, I had the weirdest shift at work, but because of the time that I was scheduled, I had plenty of time to play around with makeup, and today, I came up with this look:


Dramatic makeup is a great way to make any Monday a little less drab. It's always important to remember that if you are going to do a bold lip, neutrals on the eye are important. Neutral eye makeup doesn't have to be synonymous with boring, simple, or "every day." In this look, I used a shimmery taupe and a matte black to create this neutral cut crease.


The key to this look is BLENDING. I wanted to have a sharp edge on the outer corner, to create a cat eye effect, but I also wanted to offset it with a beautiful smokey effect as the shadow neared the brow bone.

For this look, I used my trusty Coastal Scents 252 Ultimate Palette, the Rimmel London Scandaleyes Waterproof Kohl Kajal in "Nude", and my favorite translucent powder, Revlon Photo Ready Translucent Finisher.


Using a flat shader brush, I applied the shimmery taupe color all over the lid, careful not to go into the crease. Then, I used a MAC 217 brush to apply my translucent powder in the crease, up to the brow bone. This will help the black color blend a little easier. I then took a small pencil brush and carefully applied the matte black color to the outer corner, as well as through the crease. I created a V shape with this color, on the outer corners of my eyes. That is what creates the cat eye effect. Then, taking my MAC 217 again, I began blending away. 

Quick Tip: Use your face powder on a fluffy blending brush to help blend any harsh lines. Your face powder on a stiffer brush will also act as a bit of an eraser. 

After I finished blending my crease color, I felt that the taupe color was losing vibrancy, so I again took a flat shader brush and reapplied the color to my lid. From here, I used my Milani Liquid Eye Eye Pencil in "01 - Black" and smudged this along my upper lash line, being careful to get in between all the lashes. The great thing about this liner is that you have plenty of time to smudge it out, but once it sets, it has great staying power. I also used this to create a small wing on my outer corner, then blended it into the V shape using a pencil brush. 

If your outer corner V isn't sharp enough, take a makeup wipe and clean up the line!

After I decided I was happy with how it looked,  I used my Rimmel London Scandaleyes Waterproof Kohl Kajal in "Nude" to highlight under the brow bone and in my inner corner. I blended this pencil and then set it with my translucent powder. Then, I topped off my lashes with a few coats of my favorite Maybelline The Mega Plush Volum' Express Mascara.

After this, I moved onto the lips. 


I took an angled brush and applied the tiniest amount of the OCC Lip Tar in "NSFW" all over my lips. Then, I wiped off my brush, and took a dark, warm-toned purple and applied this to the corners of my mouth. This added an ombre effect to the lips that add an extra vampy punch. Don't be afraid to be heavy handed with the purple. After I had the corners to my liking, I applied a light coat of the Maybelline Color Sensational Color Elixir in "Signature Scarlet" to help blend together any harsh lines created between the lip tar and the purple shadow. 

When I finished with the lips, I went back in and applied my foundation and brows. The same routine as usual:  Too Faced Primed and Poreless face primer, L'Oreal True Match Foundation in the shade C2,  Inglot 358 Matteand my Ardell Brow Sculpting Gel. I also went in under the eyes with the Rimmel London Wake Me Up Concealer in Very Fair, and used a flat concealer brush to help define the cat eye shape even more. Then I topped it all off with my Revlon Photo Ready Translucent Finisher

I used my Inglot 358 Matte shadow as my contour shade, which I ran in the hollows of my cheeks, around the jawline, and on the sides of my nose. Then I used my Morphe 10 Color Blush Palette to create a subtle flush to the cheeks. 


In the pan, this color looks very brown. However, when applied, it creates a beautiful, natural glow.

And, as always, I finished everything off with my Mac Fix+!

Now, onto the nails! 


I've been super into The Hunger Games recently, hence the title "Nails on Fire." But I found this polish at Walmart last night and am completely in love. I only wish the photos could do it justice. It's the Rimmel London Lasting Finish Pro Nail Lacquer in the color "Lava Red." It's just this amazing, almost holographic oxblood shade and I am so, so in love. In certain lights, it appears almost brown, and in others, very purple. But in direct light, it is so beautiful and almost indescribable. I wish I knew how to better describe this polish, because it is to die for. And for a little over $3? A total steal. 

- d.