menu

Wednesday, January 28, 2015

Negaverse Rampage

Obviously, I've been very into the vampy makeup looks lately. While I was back home in San Diego, I FINALLY found Wet n Wild's Mega Last Lipstick in the shade "Vamp It Up," which is a pretty spot on dupe for MAC's "Cyber," and I am completely obsessed! For this look, I decided to give the new Real Techniques Bold Metals brushes a good test and use them exclusively for this look, to see what these brushes can do, and so I could give a solid review on them, which I posted not too long ago! I literally used these brushes and no others! The review is in two parts, and you can view Part 1 here, and Part 2 here. Not only will I be going over which products I used for each step, but I will also be discussing the brushes!

Also, a big shout out to my friends Chloe and Ashley for helping me come up with a name for this tutorial! I really liked both of their ideas and ended up doing a fusion of both. Chloe mentioned that it reminded her a lot of the Negaverse from Sailor Moon (throwback anyone?) and I love that she mentioned that because I never would have noticed that it's totally a look Queen Beryl would wear.


For today's look, I decided to do brows first and foremost, so, using the 202 Angled Liner brush, I filled in my brows with "Triple Fudge" (a dark, cool brown shade) from the Too Faced Chocolate Bar Palette.  Then, to prime the lid and clean up under the brow a bit, I used my MAC Studio Finish Concealer, and used my fingers to apply this all over the lid and up to the brow. I used the 101 Triangle Foundation brush to help clean up underneath my brow.

For the eyes, I used the tape method to help ensure a crisp, clean line on the outer edges. To help everything blend well, I used "White Chocolate" (a light cream shade) from the Chocolate Bar Palette to set the concealer into place. Then, using the 200 Oval Shadow brush, I swept the color "Champagne Truffle" (a shimmery, pale pink champagne color) from the Chocolate Bar Palette all over my lids, stopping at the crease. I used the 201 Pointed Crease brush and a mix of the "Salted Caramel" (a warm, sandy camel) shade from the Chocolate Bar Palette and the "Nectar" (similar to "Salted Caramel," but slightly more peach) shade from the Lorac Pro 2 to start a soft sculpt in the crease. I also brought this color up onto the brow bone a bit, blending upward. Then, I took the same Pointed Crease brush, wiped it off on a paper towel, and began blending "Candied Violet" (glittery purple) from the Chocolate Bar Palette into the crease, going slightly above the crease and into the peachy mix I placed before. After I placed this color, I decided it wasn't quite purple enough for what I wanted, so I went back into the crease and used "Plum" (basic purple) from the Lorac Pro 2 on top of the "Candied Violet" shade. I continued building this color up until I was happy with the saturation of color. Then I went back in with the 200 Oval Shadow brush and added more of "Champagne Truffle" onto the lid, since the purple shades made it a little more muted than I desired. On the inner corner, I used "Snow" (pearlescent white) from the Lorac Pro 2, and as a brow highlight, I used "Beige," (pearlescent champagne) also from the Lorac Pro 2. On the outer two-thirds of the lower lash line, I used "Candied Violet," then on the inner third, I again used "Snow."


I took the Milani Liquid Eye Liner Pencil in "Black" and lined both my upper and lower waterlines. For my bright pop of a beautiful indigo liner, I used NYX's Studio Liquid Liner in "Extreme Purple." I'm not the biggest fan of this formula or the brush, but the color is beautiful so I'm willing to make it work. Instead of using the brush that the liner comes with, I applied the product to the back of my hand and used the 202 Angled Liner brush to create my winged liner. I then prepped my lashes with a coat of the Mally Volumizing Mascara and used the Andrea 53 Lashes. Because these lashes were kind of on their last legs, I used the Mally mascara to help blend my natural lashes and the falsies together, and then used the indigo liner to help hide the lash band. In retrospect, I probably should've used a black liquid liner to hide the lash band, but lesson learned!


For my face, I went for a perfected, sculpted look. I first used Benefit's The Porefessional to prime. Then, I used the 101 Triangle Foundation to apply my favorite CoverGirl Outlast 3-in-1 Foundation. Then, I used the Maybelline Fit Me Concealer on my under eye area, and again used the 101 Triangle Foundation brush to blend it out. I used the 100 Arched Powder brush to apply my translucent powder, then, using the 300 Tapered Blush brush, I applied the "Banana" powder from the Anastasia Contour Kit on my under eye area. This brush is perfect for this step! I used this same brush to apply the "Sand" highlight shade to the tops of my cheekbones, which helped create a really glowy effect. Next, I used the 301 Flat Contour brush and the shade "Fawn" to sculpt and contour my cheekbones. This brush is seriously the most perfect contour brush, and I don't think I can go back to using anything else! Finally, with the 100 Arched Powder, I applied the Maybelline Fit Me Blush in "Light Rose" for a subtle flush.


Now for the star of the show -- the lips! I used Wet n Wild's Mega Last Lipstick in the shade "Vamp It Up," and applied it straight from the tube and onto my lips, Because this product is a little bit hard to apply due to its matte finish, I used the 202 Angled Liner brush (after wiping it off, of course) to help smooth it out a bit. Then, using the Angled Liner brush again to apply a small amount of this gorgeous Lip Paint from Face of Australia, which sadly seems to be discontinued! However, you can achieve a similar look by just applying a clear gloss on top of the "Vamp It Up" lipstick.


I really enjoyed doing this look for you guys! I really ought to go in with no expectations and to just play more often -- I tend to get my favorite results that way. If nothing else, I hope this look inspires you to step out of your comfort zone and wear a bold lip color or strong cat eye!

- D. 

Thursday, January 22, 2015

First Impressions: Real Techniques Bold Metals Collection -- Part 2 + Collection Wrap Up

I finally got my hands on all of the Real Techniques Bold Metals brushes! This is Part 2 in my two-part series on these brushes, so if you haven't read Part 1 yet, click here. If you have already read Part 1, then keep on reading.


I'm going to dive right in and get straight to the brushes. If you would like more of an introduction to what these brushes are, how they look, and the features, feel free to read Part 1!

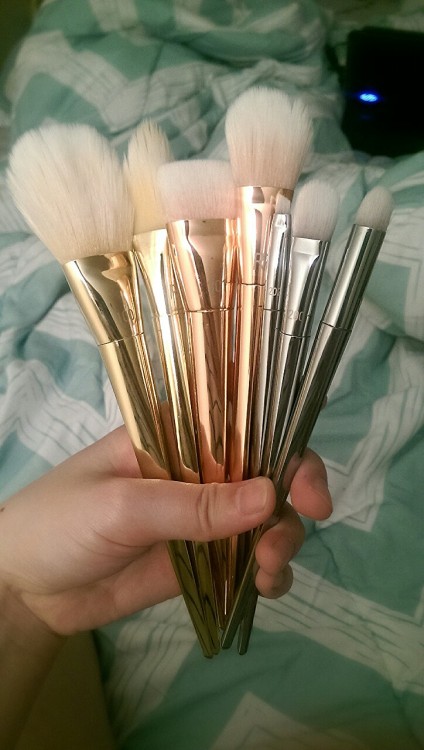
The brushes I was missing in Part 1 were the 100 Arched Powder, 101 Triangle Foundation, 301 Flat Contour, and 200 Oval Shadow. As you can see above, these are the brushes I will be reviewing today!


I wasn't certain about getting the 100 Arched Powder at first because I already had a powder brush that I enjoyed using. However, it was old and shedding, so I decided to spend the $26 and get this one! I definitely don't regret it. It's incredibly soft and luxurious feeling. It is a somewhat flat brush, almost like a larger, fluffier version of the 300 Tapered Blush. It's pretty standard in terms of what it does, but it feels like a treat putting this brush to my face. My only complaint is that, because of the white bristles, you can't tell how much product you have on your brush when using translucent powder.


The 301 Triangle Foundation REALLY surprised me. In fact, I almost didn't get it, because I normally hate flat foundation brushes, and this basically just seemed to me like a glorified version of the standard flat foundation brush. For the most part, I find that flat foundation brushes leave my skin streaky and cakey-looking. However, after using it I'm pretty impressed, especially after cringing at spending $24 on it. While the bristles are a little long, making the brush a bit flimsy, this brush can blend foundation out beautifully. I like to use the flat side to first "paint" on my foundation, and then use the pyramid-point side to blend it in! Because of the way the brush is shaped, I found that this is definitely the easiest and most foolproof way to use the brush. While it's still not my absolutely favorite for applying a more natural-looking foundation (I'd still reach for the Expert Face Brush over this one), I'd definitely use this on clients when trying to achieve a super flawless look!


If there is one brush I'd say is a must-have in this collection, it's the 301 Flat Contour. It's $26 and worth every penny. Everything about this brush is just so right. First of all, the super short bristles ensure that your contour powder is going EXACTLY where you want it, without the bristles being flimsy and getting powder everywhere. And because the bristles are so incredibly dense, it blends product out like an absolute dream. I wish I knew how to express how much I adore this brush. Seriously. If you can get your hands on it, don't hesitate! It's a similar concept to the NARS Ita Kabuki Brush, but half the price! 


The 200 Oval Shadow is a bit of a struggle for anyone with smaller eyes. It's about twice the size as a MAC 239, and it's kind of easy to get product everywhere when using this brush. It's a little bit flimsy, making it a little bit difficult to apply product with. However, this would be a great "clean up" brush. What I mean by that is, sometimes, when I've gone a little overboard with the shadows and brought them too high up on my brow bone, I like to take either my face powder or an eyeshadow similar to my skin tone and use a brush like this to bring the colors back down to where they should be. Overall, it's an okay brush, but not a must-have by any means, especially at the $16 price point. 

Like the other brushes in this collection, these do not shed at all after being washed! In terms of drying time, it was pretty standard. I washed them in the evening, and in the morning when I was ready to do my makeup, they were all dry.

Final Thoughts: Nothing stands out to me like the 301 Flat Contour. I just can't. It's no wonder this brush was sold out for weeks after the collection was released. Overall, these four brushes are beautiful to look at, are easy to clean, and get the job done!


Collection Wrap Up: Overall, the Real Techniques Bold Metals Collection is absolutely beautiful. These are the kinds of brushes you want on display on your vanity! The quality of the bristles on every single brush is exquisite, as well as the general build of all of them. Now that I've used all of the brushes, let's go back and do a recap and final review!

The 201 Pointed Crease brush is large and dense, and costs $16. I wish it came to more of a precise tip, because it can be difficult to use on smaller eyes, but it blends out product flawlessly. The 300 Tapered Blush brush is quite small, and kind of like a fluffier version of a standard flat foundation brush. It costs $24. I've played with it quite a bit since purchasing it, and I've realized that it is actually the perfect brush for setting my under eye concealer and for highlighting the face! I much prefer using it for more precise applications than blush. The 202 Angled Liner is very small, dense, and pointed, and costs $16. It's a little bit sharp, so if you have sensitive eyes, be wary. However, if can give you a super sharp and precise line! It is also fantastic for filling in the brows. Because it is so small and precise, it successfully applies even powder products in a way that looks like small brow hairs! The 100 Arched Powder is a standard powder brush that costs $26. It's not really anything special, but it is super soft and doesn't shed at all, which makes the final steps of my foundation routine just that much more enjoyable. The 101 Triangle Foundation brush is not quite what you'd expect, and definitely an upgraded version of a standard flat foundation brush, at $24. It creates a full-coverage canvas, which is perfect for anyone who wants to achieve a flawless look. The 301 Flat Contour is the creme de la creme, and worth the $26, hands down. An absolute must-have. It both places and blends contour powders like an absolute dream! Finally, the 200 Oval Shadow brush, is a little bit difficult to use for smaller eyes, but it places products well and feels soft on the lids. It costs $16.

Of course, you can definitely do an entire look using this entire collection. It is definitely a full set of brushes, and can easily help create a professional look and feel to your makeup look! This is a preview of a look I'll be posting soon, with which I exclusively used the Bold Metals brushes to apply the product.


I hope you found this First Impressions post helpful, and I really enjoyed getting to use these brushes! Is there anything out right now that you would like me to review? Let me know in the comments below!

- D. 

Monday, January 19, 2015

Notable Products of 2014

It's time for my annual product round-up! I know this post is like three weeks late, but while I was in California, I didn't have access to all of the products I was listing below, since I left some of them in my apartment in North Carolina.

2014 was a bit of a crazy year, but I learned so much about myself in this past year and that made everything worth it. In terms of blogging and beauty, I feel like my blog really blossomed into its own kind of identity during 2014, and I can't wait to experience 2015 will all of my readers, and the new ones to come! This year, I decided to do the same categories as last, with a couple of additions!

Best Hair Product


Matrix Biolage ForteTherapie Strengthening Conditioner. I'm super bummed about this product because I'm currently reading that it has been discontinued! This conditioner was a hair savior this year, and I've noticed my hair growing so much faster and stronger than it did before. My hair is super damaged due to coloring and heat styling (but mostly lots and lots of coloring), and this conditioner really helped to refortify my hair and make it feel like new! Matrix did release a line that is supposed to be a replacement for the ForteTherapie line, but according to the reviews, it's nothing compared to the original. Time for a new holy grail conditioner hunt I guess! Any suggestions? 

Best Nail Product


INM Out the Door Fast Drying Topcoat. I found this product earlier this year, and it has done wonders for my manicures! I still use my trusty Revlon ColorStay Longwear Nail Enamel Base Coat, but I have replaced my Revlon Top Coat with the INM Out the Door Topcoat, and I am so happy I did! This stuff is super comparable to Seche Vite, only much less expensive, and it won't goop up over time like Seche Vite does! Finally -- a nail product I'll actually be able to get through!

Best Brow Product


Too Faced Chocolate Bar Palette -- "Triple Fudge." This category caused a huge internal debate for me, as I couldn't decide between two different products I use almost exclusively for my brows. Finally, I decided on the "Triple Fudge" shadow from the Too Faced Chocolate Bar Palette. I use this color on my brows almost every single time I do my makeup, and it never lets me down! It's a great shade for my brows and, with a small angled brush, filling my brows in is a total breeze.

Best Face Product


Rimmel Wake Me Up Concealer. This should certainly come as no surprise to any avid reader of my blog. I use this concealer for pretty much everything -- under the eyes, over blemishes, to highlight the brows. Everything. It's the perfect consistency to use under the eyes without being cakey, with just enough coverage to hide any acne or blemishes, and just a slight brightening effect which makes it great to clean up the brows! I couldn't find this product in North Carolina, so I hoarded the last little bit of it that I had for as long as I possibly could, until I could come back home and buy more! You can see that this little tube is obviously very well loved.

Best Eye Product


Maybelline The Mega Plush Mascara. This product did so well for me this year. It's been my go to mascara all year, and I am still loving it! It's especially great for minimal makeup days, since it has such a soft effect on the lashes. It really helps to separate your lashes, so it's a great first coat of mascara to keep other products from clumping up!

Best Lip Product


Jack Black Intense Therapy Lip Balm. This lip balm is...dare I say it...the balm. -buh dum tss- No but really, this lip balm is my holy grail. It just hydrates my lips so beautifully and is the reigning champ for "Best Lip Product" on my blog after making my Notable Products of 2013 post almost a year ago. It has given ever other lip balm I've tried a total run for their money. I've repurchased tube after tube of this lip balm and I don't think I can ever turn to anything else!

Best Makeup Brush/Tool


Beauty Blender. It's almost embarrassing how long it took me to get into this sponge, and although it isn't quite a "brush," it's totally a major makeup must-have! I'm obsessed with this thing, and after doing my Battle of the Blenders post back in July, my love for the Beauty Blender only grew even more. It applies face makeup absolutely flawlessly, and no other sponge can even truly compare! If you haven't bit the bullet and just gone for it yet, this is definitely one thing I would say you should splurge on!

Biggest Surprise of the Year


Maybelline The Rocket Mascara. If you have been reading my blog for a while now, you'll know that when I first tried this mascara, I was not a fan. I even included it as an "un-favorite" for the month of March! Then, come May, I withdrew my statement, after finding out how this mascara only got better after it dried out for a few months. This mascara has continued to surprise me throughout the year. I find that, my favorite way to apply it is over the Maybelline The Mega Plush Mascara, to give me full, defined lashes!


Biggest Disappointment of the Year


Benefit They're Real Push-Up Liner. Oh how I wanted to love this product so much, but I just couldn't. I know so many people who loved this product (including my friend Sarah of Diary of a Beauty Padawan), but I just couldn't get on board. It balled up and applied weird and didn't even last all that well. I did a full review of it here. The photo for this product is even just an old one from my review because I returned it and never looked back! How funny that both this year's and last year's disappointing product is a Benefit They're Real product.

Most Loved/Used Product of the Year


Jack Black Intense Therapy Lip Balm. This stuff is soooo good that it's on this list twice. Go back up to "Best Lip Product" and read about why I love it so much. I have gone through multiple tubes of this over the course of 2014, and it is without a doubt my most used product of the year. 

Last-Minute Honorable Mention


Mally Volumizing Mascara. For Christmas, Andrew bought me The Perfect Wink by Ulta, which I talked about in my Christmas Beauty Gift Guide post in November. This mascara came in the collection, and it is amazing! I had been wanting to try this mascara for a while, but it's $20 a pop, which deterred me for a long time. However, I'm not sure if I can go back now. I've worn this mascara quite a few times since receiving it from Andrew, and it doesn't smear, smudge, or flake, and gives me super long, super thick lashes that almost make it look like I'm wearing falsies!

Overall Top Brand of the Year


Makeup Geek Cosmetics. I debated on whether to award this to Makeup Geek or to Too Faced, but when I really looked back on the year, Makeup Geek had my heart. For one, Marlena, the CEO of the company, is pretty much the sweetest, kindest woman in the YouTube Beauty Industry. Second, her makeup is absolutely incomparable to anything else. The quality of the products, the pigmentation, and Marlena's constant motivation to keep her products top-of-the-line made Makeup Geek my absolute favorite brand of 2014!

Looks like this was a great year for mascaras! What were your 2014 favorites? I hope you had a wonderful and safe New Year!

- D.

p.s. Around the turn of the New Year, one of my very best friends in the world (and one of those most talented people I know), Ciarlene, started her own blog! It's more of a lifestyle kind of blog, and she pretty much posts about anything she feels like talking about -- anything from food, to beauty, to video games, and crafts. I feel I need to give a bit of a profanity warning, if you're sensitive to that kind of thing. But if not, definitely check her out here. I've been nagging her for months to start her own blog, and I'm so excited that she finally did!

Thursday, January 15, 2015

Sporty Chic

Everybody loves a good baseball game. For this post, I decided to come up with a sporty chic look just early enough to prep your look for the pre-season! I know a lot of women struggle with ideas on what to wear to the big game, especially if they don't already have a jersey. Hopefully this gives you some inspiration!

After reading this post, I definitely recommend checking out Fanatics, the online store that inspired this post, to help you get ready for game day. They don't only sell baseball hats -- they sell anything from collegiate sports to NASCAR merchandise, and you can certainly find something for you or any sports fanatic in your life!


So for this look, I didn't do the typical jersey-style shirt and sneakers that most people think of when they thing of "Sporty Chic." Instead, I leaned more toward the "Chic" end, and came up with a look I'm pretty happy with! My favorite part about this look is that it's so relaxed and comfortable, but it still looks put together, and it's definitely perfect for a day at the ball park. And in case you're wondering, I used Polyvore to help create this collage!

Obviously, I chose my home team, the San Diego Padres, to inspire this look. I went with this Padres hat style from the 1990s, which I remember always seeing as a kid -- in fact, I think I had a hat very similar to this one! According to the official Padres online shop, this was the style the Padres wore between 1991 and 2003.

For the rest of my look, I went relaxed. To show lots of team spirit, I chose to stick to blue tones, with a pop of a coral to add a modern twist on the old school orange logo. For my top, I chose to go with this easy-going striped tee from Charlotte Russe. I loved how the contrasting texture of the faux leather pocket really helps amp up the look, and ties in well with the leather combat boots. If you go on the website, you can see it also has a really fun sheer back! To go on top, I chose a classic chambray boyfriend button up, from Wet Seal. This chambray top could easily be tied around the waist to show off the sheer back of the striped top, or thrown on as a cover up on a cool summer night at a ball game. For my jeans, I went a simple distressed dark wash jegging from Aeropostale, which would be tucked into these fun, relaxed combat boots by Steve Madden. For a pop of color, I added a coral leopard print scarf from Express, to help really make everything look put together, and to add more variation in terms of patterns!

Shop the Outfit:

I hope you enjoyed this look! This summer when I go home, Andrew and I are planning to go see the Padres play the Rockies, which is his favorite team, and I will probably wear an outfit similar to this one. I hope you can draw some inspiration from this!

- D. 

Sunday, January 11, 2015

Ice Queen

When I first started working on this look, I was wanting to do something fun and colorful, yet slightly subdued. And when I started playing with the colors, I hated it. This look is a primary example though of a look that I started out hating, but ended up loving! This is a fun, colorful, icy look that is loosely inspired by Frozen (which was totally unintentional, but that's the way it ended up going...)! It is also incredibly easy and will definitely get people stopping you to tell you how much they love your makeup!

I'm also gonna take a moment to recognize that I probably look incredibly conceited/into myself right now because I'm sitting in an airport as I type.


To start this look out, I covered my entire mobile lid using my NYX Jumbo Eye Pencil in "Milk." Next, I used my Coastal Scents 252 Ultimate Eyeshadow Palette, and took a medium shimmery purple color and used that on the outer two-thirds of the lid. Then, with a very, very light hand, I took the dark navy color and placed this in the crease, being careful to really blow this color out and keep it from getting too intense. Finally, on the inner third of the lid, I took the light shimmery silver color and used that as a highlight.


For the blue liner, I used the Milani Liquid Eye Mechanical Eye Pencil in "Blue," which is a gorgeous, shimmery royal blue color. I did a fairly thick line, and brought it two-thirds of the way along the lower lash line, to help start out our gradient liner. I then went back with my NYX Jumbo Eye Pencil in "Milk" and used this on the inner third of the lower lash line. I used both of these pencils as a base for the next color, which was the light blue eyeshadow, and applied this color to the lower lash line, fading it into the dark blue liner to create a beautiful gradient effect. Then I used the L'Oreal HiP Color Truth Eyeliner in "Black" to tightline, although this would definitely look even better with a purple or blue liner! I did not use the blue liner on my waterline because of the glittery specks in the liner, which make it unsafe for use in the waterline. Then, I topped it all off with Maybelline The Mega Plush Mascara and Maybelline The Rocket Mascara.


I wanted really intense brows but really subtle cheeks for this look, so I used the Anastasia Dipbrow Pomade in "Dark Brown" (which is weirdly not available in "Dark Brown" on the Anastasia website, but is available at Sephora and Ulta) through my brows, and topped it off with the Benefit Gimme Brow in "Medium/Dark." To contour, I used Inglot 358 Matte, and for a subtle peachy glow, I used the Milani Baked Blush in "Luminoso."


On the lips, I chose to keep it a similar color to my natural lips, but obviously, much prettier. I used the Make Up For Ever Rouge Artist Natural Lipstick in the color "N9 Copper Pink."


I hope you enjoyed this look! Have you gotten any snow where you live? 

- D. 

Wednesday, January 7, 2015

First Impressions: Real Techniques Bold Metals Collection -- Part 1

Of course the whole world has been going absolutely NUTS over the new Real Techniques Bold Metals Collection that just came out. These absolutely gorgeous metallic brushes were released late December, and since I've been home in San Diego (where there are like 8 or 9 Ultas), I've been on the hunt for all of them. As of right now, I only purchased 3 of the 7, since they are nearly impossible to get a hold of in stores! So instead of waiting to do a huge collective review, I decided to do a first impressions in two parts.


To start, let's talk about the collection itself. There are 3 categories of brushes: Base, Eyes, and Finish. The Base brushes are gold, the Eye brushes are Silver, and the Finish brushes are rose gold. The handles are a tapered square shape, making them easy to take out of a brush belt, and guaranteeing that they won't roll off your table or vanity when you set them down. The brush handles are also weighted for ease of application and control, while the brass ferrules ensure the durability of the brushes. Finally, the bristles themselves are synthetic hairs, but mimic real hair, since each individual hair is tapered on the end. The bristles have been both tied and glued, in order to maximize the lifespan of each brush.

The first three brushes I purchased were the 201 Pointed Crease, the 300 Tapered Blush, and the 202 Angled Liner. 

The packing itself is solid and beautiful. When I first took the brushes out of the packaging though, I noticed that it had a really annoying sticky adhesive holding them into the packaging, which was a bit difficult to get off. I was worried that if I used alcohol, the metallic paint would come off, but I took a risk and it wasn't a problem at all. The adhesive easily comes off with alcohol, and the brushes looked pristine!


Each of the brushes also has RT stamped into the ferrules, along with the number of the brush on the opposite side.


Let's start with the 201 Pointed Crease brush. This brush costs $16, and, obviously, is meant for the crease. It's almost like a large pencil brush in density. It picks up and places product really well, and comes to a nice point at the very tip, which is great for precise application. Because it is so dense, it buffs out product beautifully with very little effort. 


The 300 Tapered Blush is one of the rose gold brushes, which seemed to definitely be the most popular of the bunch. It is paired with the 301 Flat Contour brush, which is pretty much impossible to get right now. It's sold out of every Ulta in San Diego, as well as online at both Ulta and Boots. Go figure. This particular brush is $24. 

Anyway, onto the brush I'm actually reviewing! The 300 Tapered Blush brush is a relatively small, rounded paddle-style brush. It isn't your typical fluffy blush brush because it is flat on both sides, with a bit of a tapered top. It's quite dense, however I find it a bit bizarre applying blush with this brush. It almost reminds me a bit of a fluffier version of a standard flat foundation brush. I also tried applying a contour color with this, and actually quite liked the effect it gave! It is also quite dense, so if you are using a very intense product, use caution. I think I will have to work with the brush a little more in order to really get a feeling for it, since I'm definitely used to using a more traditional blush brush.


Finally the 202 Angled Liner brush. Of the three brushes I purchased, this is probably my absolute favorite, and well worth the $16 price point! It is super small and precise, making gel liner a total breeze. I haven't been so happy using gel liner in quite a long time as I was using this brush! It is super dense and the bristles are short, making application super easy and precise. This is definitely the perfect brush for anyone who is a gel liner junkie like me, or new to using gel liner!

After using all of these brushes, I decided to put them to the test and give them a good solid wash! I expected the blush brush especially to shed, since I've had trouble with my Expert Face Brush shedding during washes, but nope. Not a single bristle fell out of any of these three brushes, which was impressive! The only thing noticed was that the Angled Liner brush did get a bit stained with my gel liner.

Final Thoughts: So far, so good! I really enjoy all three of these brushes, and I'm really excited to get the last four of the collection. I will definitely have to do a follow up and let you all know how these brushes are holding up, but after my first use/wash, these brushes have definitely impressed me so far!

Are you planning on getting any of the new Bold Metals brushes? Which ones do you want?

- D. 

Friday, January 2, 2015

His & Hers Face and Outfit of the Day -- Disneyland Edition

Happy New Year! Right now I'm currently home in San Diego celebrating the holidays with my family. For Christmas, Andrew decided to take me to Disneyland, and we had an absolute blast! It was pretty chilly at Disneyland when we went, and it only got colder as the day turned to night, which I suppose is pretty appropriate considering all the Frozen stuff they have up in the park right now. For this outfit of the day, I decided to include what Andrew wore as well!


Let's start with his outfit, since I am going to include my makeup in this post! We were planning on buying him some sunglasses, which is why he is so squinty, but unfortunately we couldn't find any that he liked. Both of our outfits were very simple, but warm nonetheless. His heather gray sweatshirt is from Old Navy, and I'm pretty jealous because it's super cozy. His coat is an amazing double-layer style jacket by Levi's, and is a wool blend, meaning he stayed warm in the colder temperatures! His jeans are a basic blue slim fit from H&M, and his boots are casual canvas Doc Martens. When the sun went down, he threw on a simple black beanie from Target, along with some dark red touch screen-compatible gloves.

For my outfit, I wore a cozy green waffle-knit infinity scarf from Target, and a basic, long-sleeve gray and white striped tee, also from Target. The best part about this shirt is that the sleeves are extra long! My jeans are my favorite high-waisted jeggings from Aeropostale, and my boots are the same cute moto booties that I featured in my fall fashion post back in October, but, go figure, they are no longer available. Of course, I also wore my favorte sunglasses, which is another piece from Target! When it got cold, I threw on an oversized faux-fur lined anorak style coat that I recently found in my closet. It was given to me years ago by my aunt, and living in San Diego my entire life, I never really needed it, until I moved to North Carolina. It isn't pictured above, but you can kind of see it below, with my two favorite face characters!


Shop His Outfit:

Shop Her Outfit: 


For my makeup, I went really simple and used long-lasting products, so I could avoid touch ups and just enjoy the park! To start out, I used my itty bitty sample size of Benefit's The Porefessional (which is lasting me ages, by the way), and primed my nose and chin. Most people will prime their entire T-zone, but my forehead was feeling exceptionally dry this day, so I didn't think I needed to. For foundation, I wanted a product that I knew was going to last all day without caking up or sliding off, so I used my CoverGirl 3-in-1 Foundation. Andrew and I had gotten up early to leave for Disneyland, so I definitely had some darkness and sleepiness under my eyes. To combat that, I used my Maybelline Instant Age Rewind Dark Circle Concealer, and set it with the "Banana" color from the Anastasia Contour Kit. Then, I set the rest of my face using the Revlon Translucent Finishing Powder (not pictured), and lightly followed up with "Fawn" from the Anastasia Contour Kit, in the hollows of my cheeks. To finish off the skin, I used Milani's Baked Blush in "Luminoso" and set everything in place with MAC Fix+.

On my eyes, I did a simple winged liner (which you can learn to do by clicking here), using the Lorac Front of the Line Liquid Liner. This eyeliner performed SO well during the day. Sometimes, when I wear winged liner for long periods of time, it creases or flakes in the smile lines near my eyes. When I got home at 2 AM after a long day at Disney, my liner looked like I had just applied it a few minute prior! For mascara, I used my new favorite, the Mally Volumizing Mascara, which was a great, fuss-free option, and makes my lashes look long and voluminous! On the inner corner of my eye, I added just a little dab of "Champagne Truffle" from the original Too Faced Chocolate Bar Palette. 

Finally, I used "Triple Fudge" from the Too Faced Chocolate Bar Palette, to fill in my brows, and I set it all into place with Benefit's Gimme Brow.


I hope this has given you some ideas for what to wear and how to do your makeup for your next big day out. I'm so enjoying my time here at home in San Diego, and I am so thankful to Andrew for taking me on this wonderful trip!

- D.

p.s. Some more photos from the day! As you may be able to tell, I LOVE meeting face characters! And the new Frozen Ice Bar in California Adventure had these cool glowing margaritas!


This is Andrew's default selfie face... He's pretty much the worst with photos.


I hope you all had a fantastic New Year!