menu

Showing posts with label halloween. Show all posts

Monday, October 27, 2014

Halloween -- The True Galactic Mermaid

A while back, I posted a "Galactic Mermaid" look using the Lorac Pro Palette 2. Honestly, the only thing about that post that was really mermaidy were the nail strips I just so happened to be wearing. However, today I did a look that could truly go either way! This look would be great for either a mermaid or alien costume. So without any further ado, let's get started!


Initially when I did this look, I was definitely aiming for the mermaid idea, hence the starfish hair clip!


Before applying any foundation, I began with the eyes. I laid down a thin layer of the NYX Jumbo Eye Pencil in "Milk," using my finger to blend the product out, Then, I took the Makeup Geek shadow in "Sea Mist," and patted this all along the mobile lid. I continued patting the shadow to really help build up the intensity. Then, I took the Makeup Geek shadow in "Envy" and used this color to really deepen the crease. After I was happy with the intensity, I took a clean blending brush to help blend the colors seamlessly, reapplying "Sea Mist" as necessary to keep the color vibrant. Finally, I applied the Makeup Geek shadow in "Rockstar" on the inner third of the lid, as well as the inner corner and the brow highlight.

To add some more variety to the look, I applied the Urban Decay 24/7 Glide-on Shadow Pencil (which is discontinued, but essentially just a chubby stick version of the original Glide-on Liner Pencil) in "Delinquent." I also lined the inner water line with the NYX Slide On Pencil in "Pure White" to give me an innocent, doll-like appearance. 

Since I wasn't exactly going for the "natural" look, I used the Makeup Geek shadow in "Envy" to fill in my brows. This is a very subtle touch, but in the right light, it is noticeable! From here, I just applied a few coats of mascara to both my upper and lower lashes.


For the skin, I applied my foundation as usual. Since I used a blue-green shadow on the lid, I really made sure to brighten up under my eyes with concealer to assure that I didn't give myself a blue-ish tone to my undereyes. From here, I moved on to the rest of the face, which was actually pretty simple. 

For the gems, I used these rhinestones that I bought from Joann Fabrics and Crafts, and applied them where I would normally apply my cheek highlight, using Duo Clear-White Lash Adhesive. Then, I applied these amazing lashes that I found at Walmart (which I seriously wish I could find online), that had these beautiful pearl accents. For my cheeks, instead of applying a traditional blush, I used the Makeup Geek shadow in "Sea Mist" and applied this the way I would a normal blush. Another great thing you could do is use a piece of lace as a stencil to create a scale-like effect on the cheeks, but unfortunately I couldn't find a piece of lace that I was happy with.


Finally, on the lips I applied MAC "Shy Girl," for that natural, nude look. However, if you decide to turn this into an alien look, I would recommend going with something like Kat Von D "Poe" or even something like the Urban Decay liner that you used earlier!

- D. 

Tuesday, October 21, 2014

Halloween -- Black Dahlia Zombie w/ No Specialty Products!

Halloween is in less than two weeks, and I know I've definitely been procrastinating getting this look out. However, I think it's about time! If you've never read about the "Black Dahlia" murder case, I definitely recommend reading up on it! Personally, I find it fascinating how far forensic science has come in 50 years. If this murder case had happened in the 21st century, who knows what we could have found! More than 55 years later, though, this case is still unsolved, and the story has been featured in film and television.

I chose to do this look on a budget, meaning I could only use products I already had, and I had no fake blood! Of course, if you want to do this look, I highly recommend purchasing a cheap bottle of fake blood from your local Halloween store. This tutorial is also perfect if you want to do a Joker costume!


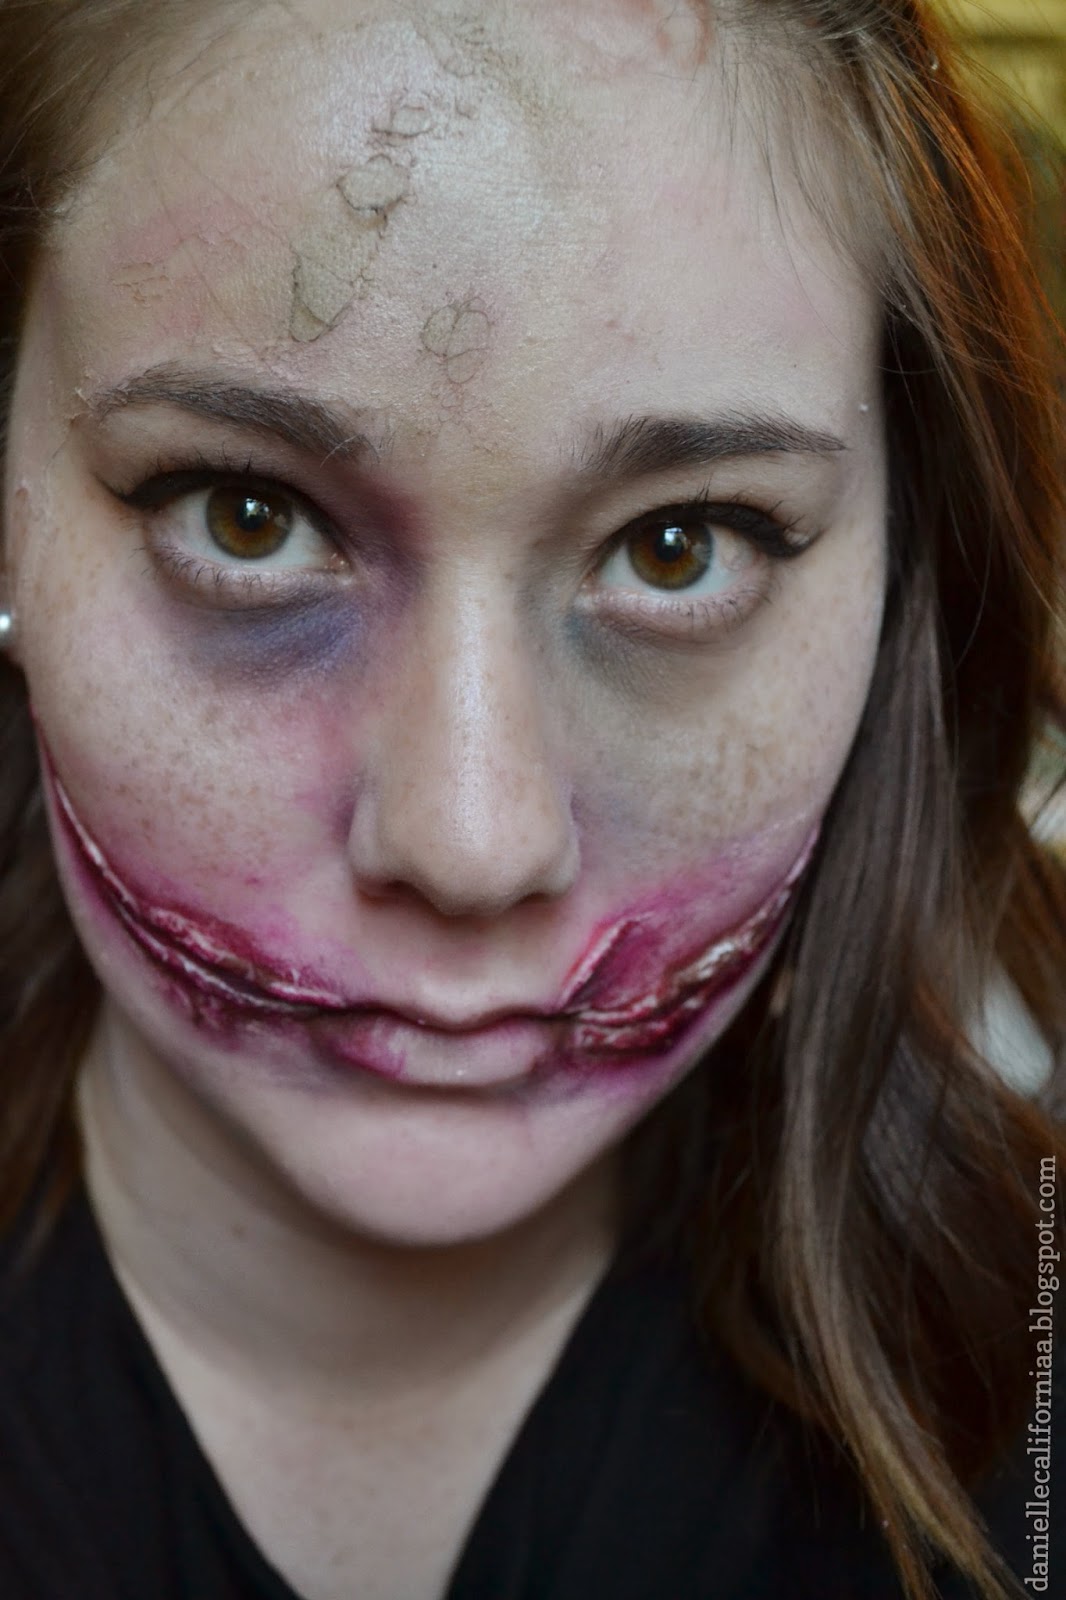
This look is actually super easy, just time consuming, To start off the look, I used the NYX Slide On Pencil in "Pure White," and traced on the shape of the Glasglow smile. This will disappear under the "prosthetic" we'll be using, but it just helps to give a general idea of where we will be placing everything.

Now for our "prosthetic." Of course, if you are allergic to latex, you will want to use a latex-free lash glue, but I just went for the Duo Eyelash Adhesive in "Clear-White," which dries clear. For a latex-free alternative, you could also go for the NYX Latex Free Eye Lash Glue, which also dries clear! You will also need some single-ply toilet paper, but if you only have two-ply, you can simply peel the two sheets apart. From here, I used a cotton swab and started patting the lash glue over the white liner we used earlier. Then, taking small pieces of the toilet paper, I began layering the toilet paper to create a torn skin effect. To help the edges of the toilet paper blend better, I layered the lash glue on over the edges of the paper, and feathered it out with the cotton swab.

Once I got a few good layers down, tapering out at the edges of the outline, I began to take small pieces of toilet paper and rolled them, placing them along the edges to create an indent for the cut. I did this along the upper and lower edges, to make it look more like the skin has been ripped apart (cute, right?). At this point, it won't look like much of anything, really.


Here is where I began to add color. Before I did anything, though, I powdered over the areas that I had applied the toilet paper with a translucent powder. Then, I mixed together my CoverGirl Outlast 3-in-1 Foundation and my Aveeno Natural Protection Sunscreen, to create a pale base. The reason I mixed in the sunscreen is because of the zinc oxide in the sunscreen. If you use a sunscreen that has zinc as an ingredient, it will give you a white cast, which is perfect for this look!

Now, back to the mouth, I used the skinny end of a cheap cosmetic sponge, and first layered on my OCC Lip Tar in "NSFW." I got pretty messy with this, but try to avoid getting it in places you don't want it, because it is a real pain to get off. I pounced this into the "cuts," as well as around it, to create an irritated look around the edges. Then, I used the OCC Lip Tar in "Black Dahlia," which only seemed appropriate, and did the same thing, this time focusing more on the inner parts of the cuts. Again, don't worry if it gets a bit messy. Around the edges, I added little bits of Lime Crime's Velvetine Lip Color in "Salem" to add a bit of a dried-blood effect. I also mixed together "Salem" with "Black Dahlia" and blended this into the inner corners of my lips, while still keeping the inner portions of my lips pale.


Now that the main portion of the look has been set up, you can begin adding some finishing touches that really bring everything together. I took the black shadow from my Coastal Scents 252 Ultimate Palette (which has obviously been well-loved) on a small angled brush, and applied this to the inner edges of the ridges that we created with the toilet paper. This creates a truer bloody color, and adds more depth to the cuts. Then, I took a mix of the blue, purple, and brown, on a fluffy blending brush, and began adding some bruising around my face. I added it around my nose and eyes, specifically, as well as around the edges of the cuts and on my chin. 

Then, I took a mix of the olive green, yellow, and just a touch of the brown, and took this again, under my eyes, in the hollows of my cheeks, and over the forehead. This creates more of a gaunt, sickly appearance. To add the effect of the peeling skin, I took my lash glue and smeared it across my forehead. Once it was dry, I began to scratch and peel at it a bit. Then, I added more of the green, yellow, and brown mixture to create almost a rotting skin appearance. 


Of course, inspired by the American Horror Story rendition of Elizabeth Short, I finished off the look with a classic winged liner using my Maybelline Eye Studio Gel Liner, as well as a coat of my Maybelline The Mega Plush Mascara and a coat of my Maybelline The Rocket mascara! Besides, what zombie-fied aspiring actress of the 1940s would want to be seen without big lashes and winged liner?


I hope this look has inspired you to do something a little more out of the box this Halloween! I personally am considering doing this look for a party I was invited to, and it's great because you don't have to go out and purchase a ton of special effects makeup! What are you planning on doing for Halloween?

- D.

Sunday, October 19, 2014

Halloween -- Last Minute, Budget-Friendly Glam Cat!

I know that the title of this post sounds ridiculous. However, I know a lot of girls want to look cute for Halloween, so I came up with this look that I think would be great for parties! My favorite part about this look is the ears, because you don't have to go out and purchase cat ears, which makes it perfect for a super last minute costume. Throw on some black clothes, this hair and makeup, and no one will question what your costume is!


Let's start with the hair! About a year ago, I was working at Sephora, and I saw a girl walk in with her hair styled into cat ears. While I was brainstorming for some Halloween looks, I remembered her, and decided I would show you guys just how quick and easy it is!


The first thing I did was part my hair down the center. You can do this however you like, but I left my bangs parted as they were (because I promise you don't want to see my hair in a center part...it isn't cute). From the root of my part, I took a small section and spritzed some hairspray through the hair to add some grip. Then, I began to braid! Make sure the braid is tight, otherwise it won't hold its shape. Then, I pinned the end of the braid about 2 to 3 inches below where it began, to create a little cat ear! I added more hairspray, and pinched the braid to create a point. Repeat on the other side, and you have super quick DIY cat ears! To finish it off, I pinned my bangs to the side and curled my hair, teasing to add some volume and a wild-like appearance.


The makeup itself is glamorous, but pretty simple. I started with the eyes, priming my lid with the Lorac Behind the Scenes Eyeshadow Primer. I took some ordinary scotch tape and pressed it on the back of my hand to remove some of the stickiness, and placed it under my eye at an angle to ensure a crisp, clean line. I took my Lorac Pro Palette 2 and used the color "Black" all over my lid, pulling it out to create a cat-eye effect. I then took a mix of "Cool Gray" and "Light Brown" and used these two shades to really blend out the edges of the black shadow. Luckily, these shadows blend together beautifully, making my job so much easier! 

From here, I carefully pulled off the tape, and smudged "Black" along the lower lash line, really blowing the color out. I then applied "Liquid Gold" pigment from Makeup Geek on the center of the lid. I used "Beige" on my brow bone as well as the inner corner, to brighten everything up, as well as NYX Liquid Crystal Liner in "Crystal Gold" along the inner corner of the lower lash line. To finish off the eyes, I lined my waterline with Milani Liquid Eye Liner Pencil in "Black." To further enhance the cat-eye effect, I applied Andrea 53 Lashes.


For my foundation, I just did my normal routine, as well as for my eyebrows. I also covered my lips with my foundation, to get rid of some of the color and provide a base for the nose! For the nose, first took a mix of "Cool Gray" and "Light Brown" from the Lorac Pro Palette 2 and heavily contoured my nose, from the eyebrows to the tip of my nose. I made sure to keep the contour pretty dramatic. Then, I took my Maybelline Eye Studio Gel Liner in "Blackest Black" with my Real Techniques Silicone Liner Brush and drew a heart shape on the end of my nose, making sure to fill in the nostrils as well. It feels pretty weird, but it only takes a minute. Then, from the septum of my nose, I drew a triangle shape down through my cupid's bow, to create the little cheek pads that cats have! To further enhance the shape of the cheeks, I again took "Cool Gray" and "Light Brown" and contoured my cheekbones, going all the way in to the corner of my mouth. Finally, I just drew some dots above my upper lip, and added some whiskers!

From here, I threw on a cute black dress and a leopard print scarf to really pull the look together, and you are party-ready!

Keep an eye out for more of my Halloween looks, I have a few easy looks prepped that will hopefully give you some inspiration if you have yet to find a costume and don't have much time to find one!

- D.