menu

Wednesday, July 9, 2014

June Favorites

I can't believe the summer is going by so quickly! As I type, I am looking at my college move in day, which is only 41 days away, and I am just absolutely astonished by how quickly this year has gone by. I feel like I was in Chicago not that long ago, but that was back in February! Anyways, I have just a couple of favorites to talk about this month, so let's go ahead and get started!


Kate Spade Beacon Street Jeanne. I am so obsessed. They no longer sell this version of this bag, however they do have the Holly Street version in "Geranium" available and on sale! Earlier in June, I received a 25% off sale items on the Kate Spade website, and of course, being a curious little cat, I had to check it out. And of course, satisfaction definitely brought me back! This beautiful bag is a charcoal gray color, so it goes with everything, and it's super roomy without taking up a lot of space. It has a patent leather body with 14k gold hardware. Originally, this bag was $398, but I got it on sale for $159, plus the 25% off, which knocked it down to $119! I've always been obsessed with Kate Spade bags, and I think I got a serious deal on this classic bag that I know will last ages. It was worth every penny!


Aussie 3 Minute Miracle Color. I've loved Aussie's 3 Minute Miracle since last year when I bleached my hair, and they recently released their color-friendly line! This deep conditioner is perfect for colored hair, and usually when I color my hair, it begins to fade after just a couple of washes. With this conditioner, my hair color is still vibrant! I loved the original formula, but I love the color formula even more.


Lush Dark Angels Cleanser. This stuff smells weird. Let's just get that out there. It's also pretty rough so I definitely could never recommend this for daily use, despite being a "gentle" cleanser. However, on my psoriasis, this stuff is amazing. I'm not a huge fan of using this on my face because I do have slightly sensitive skin, but I use this on my psoriasis maybe once a week, and I have seen such an improvement! My skin is soft and smooth as opposed to flaky and painful. It is still red as it usually is, but I have noticed that after using this cleanser, the little psoriasis scales that I get usually clear up for a few days. I use this on my entire face once every couple of weeks, just for a really exfoliating deep clean, but for psoriasis, this unique cleanser really helps make my life a whole lot easier.


Wet n Wild H2O Proof Liquid Liner. I know this liner has a lot of mixed reviews, but personally, I absolutely love it. This was the first liquid liner I ever bought, and I still love using it! It's essential for summer, especially if you plan to go to any summer parties where you aren't sure if you will be swimming or not, because this stuff does NOT budge. Period. The only way to get this off is with an oil-based cleanser, and sometimes, that isn't enough. But if you're like me, and you want your liner to look perfect when there is a possibility that you might be in the ocean or the pool (or if it's just insanely humid!), this liquid liner can't be beat in terms of staying power, and is super affordable at around $3!


Band-Aid Brand Advanced Healing Blister Cushions. Okay, so this probably sounds a little bit funny to be talking about in my favorites for this month. However, these things have saved my feet. This month I recently bought a new pair of flip flops, and despite how much I love them, they have been a beast to break in. I feel like I'm super prone to blisters, but these blister cushions are perfect! They stay on really well, and help to cushion the blister against your shoes to make the pain more bearable. I don't think I could ever go back to using regular bandaids again!

And that's it for this month's favorites! I've definitely done my share of spending this month...but I've sworn off of any big purchases, I promise! ;) What have you been enjoying this month?

- D.

Thursday, July 3, 2014

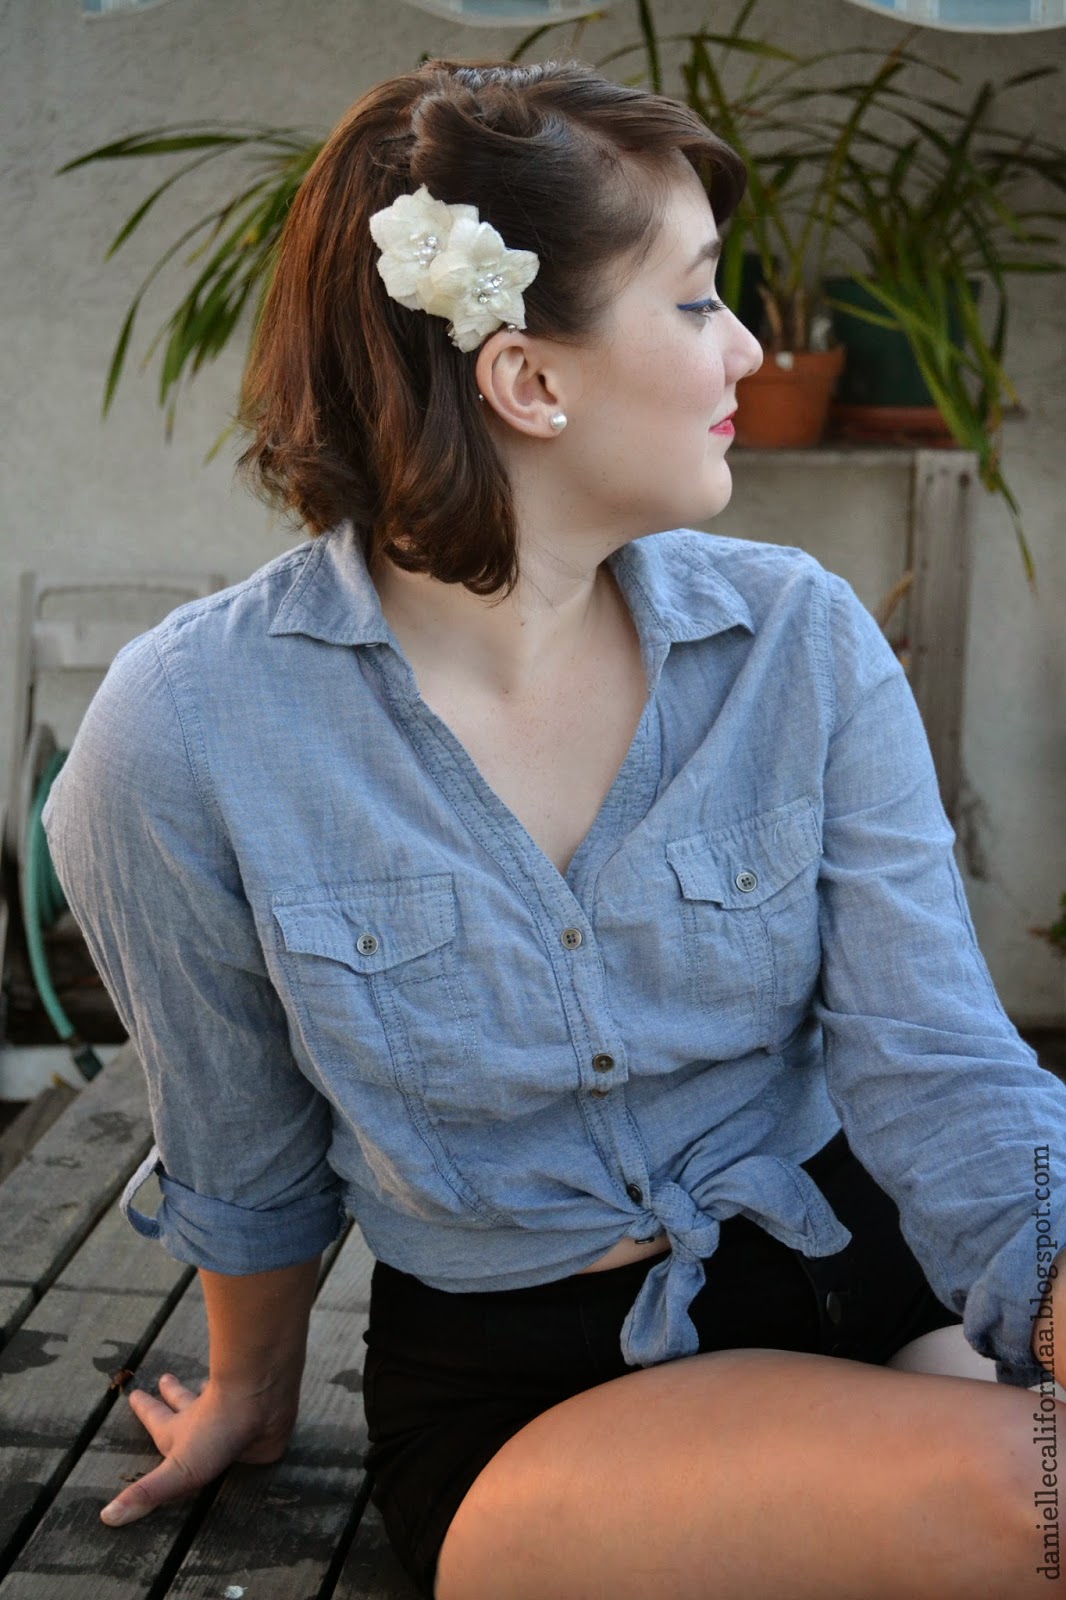
Pin-up Inspired 4th of July Makeup, Hair, and Outfit

Hey everyone! The other day I was playing with my hair, and I found out that my hair is long enough to do victory rolls again, and I was super excited. For the longest time, my private Twitter photo was a picture of me with victory rolls, and so many people have asked me how I did it. So here's how, along with a full makeup that would be perfect for the 4th of July, and a pin-up inspired outfit.


Starting with the hair, victory rolls are actually a lot easier than you may think. All you really need are lots of bobby pins, some hairspray, and a comb!

First, I take the section of hair that I want to style into the victory roll. For me, I usually just take a rat tail comb and go from right about the ear and toward my part, and make the roll out of that section. Most of the time, especially if you have bangs, you can't go wrong doing that! Then, I hairspray the entire section to give it some hold, especially because my hair is pretty slippery most of the time, and separate the section into two horizontal sections (think of "horizontal" as "from one ear to the other"). I clip the front section out in order to keep it from getting mixed up with anything else, and then backcomb (or tease) the back section in order to give the bobby pins and the front section a proper base to hold onto.

I'm not very good at explaining exactly how to do this, so here's a diagram that will hopefully help.


After you've teased that section, all you have to do is take the front section and slide it over the section behind it. I usually like to wrap the hair around my finger and then loosen my grip to create the perfect rolls, 
but honestly, the key to this look is practice and bobby pins. I only really place bobby pins in the roll itself, and sometimes in the back if they need a little extra security. 

Another thing that might make this easier is to take a 1" curling iron and curling the hair upward and away from the face. That will give the roll a direction and a mold to go into, as opposed to just falling right back down. After I've secured all the bobby pins, I always spray in my hairspray and then smooth over it all with a comb. If the back of your roll looks a little messy, you can always add some kind of hair piece for some added flair, and no one will ever know that it is messy!


The makeup for this look is very simple but always classic! I won't be explaining how I did the winged liner, because I already did a tutorial for that here


Starting with the face, I used my trusty L'Oreal True Match Foundation with my Beauty Blender to give my skin a flawless finish. My skin has been acting up a bit lately, so I took my Rimmel Wake Me Up Concealer over any of my blemishes as well as on my lids, and my Maybelline Dream Lumi Touch Concealer to highlight under my eyes. I then took my Anastasia DipBrow Pomade and filled in my brows, making sure to keep them super defined to really get that pin-up look. Then of course, I used my Anastasia Clear Brow Gel to set the brows into place.


For my eyes, I first took my Makeup Geek shadow in "Beaches and Cream" and put this all over the lid and up to the brow bone. I find that this shade is perfect as a starting point to make sure everything blends nicely. Then, I took "Unexpected" and ran this in the crease, making sure to keep it defined yet blended. I really wish I had this shade for when I did my Karlie Kloss look, because it would have been perfect in the crease! Then, I took "Shimma Shimma" and used that on the browbone, making sure to blend it out so it wouldn't be harsh, as well as in the inner corner. 

After finishing the eyeshadow, I took the Milani Liquid Eye Twist Up Pencil in "Blue" and created a pretty substantial winged liner. It wasn't over the top, but I made sure it was thick enough to be noticeable. While this set, I ran my Rimmel Scandaleyes Kohl Kajal in "Nude" in my waterline to really open up my eyes. After that, I curled my lashes and used my Maybelline Volum' Express Mega Plush Mascara, focusing especially on the outer corner to really help give that cat eye effect. I also did a very light coat of this on my bottom lashes, just to help define them a bit more. 


After setting my face with my Revlon Photo Ready Translucent Powder, I took the middle contour shade from the Anastasia Contour Kit and contoured my face. I did a whole post about how I contour here, and let me tell you, this palette makes contouring so easy! After that, I used my Morphe Blush Palette and the upper mauve shade to give my cheeks a very subtle color.

Finally, on the lips, I just took my OCC Lip Tar in "NSFW" on a lip brush and carefully filled in my lips with this perfect pin-up red.


Of course, you can't have a fun summery pin-up look without cute high-waisted shorts! These shorts are very basic high-waisted black shorts that stretch to fit my every curve and I love them! They no longer sell these exact shorts, but they do have a very similar pair at Forever21. For my shirt, I bought this chambray shirt a few years back and I still absolutely love it! I tied it up around my waist and rolled up the sleeves. Chambray is super popular right now, so you can get it pretty much anywhere, but I know I got this specific one from Target. Of course, I had to throw on my classic red Keds, which when great with my red lips! For my jewelry, I just wore simple pearl stud earrings. I got my white flower hairpieces from Charming Charlie a few years ago, and they also have little pearl accents!

And that's it for this super long post! I hope that you all have a wonderful 4th of July (even if you aren't from the US)!

- D.

Tuesday, July 1, 2014

PHAMExpo Haul!

I know I'm dishing these PHAMExpo posts out fast, but I am just so excited about it still! I'm currently painting my nails with one of the polishes I bought and I've already used some of the products that I purchased at the show. I unfortunately didn't do any swatches (except one), but that's because I'm actually planning on doing a big review of some of these products!


Like I said in my last post, I did some damage...But I am so, so excited about these products! I'll first cover the products I didn't take photos of. 

At Real Techniques, they were practically throwing their accent brushes at us! They told us to take as many as we liked, so I grabbed 5 of them. Sam and Nic were absolutely lovely and took time to talk to every single person who came to their booth, and their crew was so funny! Unfortunately, they weren't selling their brushes at the show, which is a bummer because I was really hoping to pick up a second Expert Face Brush, as well as their Miracle Complexion Sponge.

From Morphe Brushes, I grabbed a pencil brush and a dual-ended brow/spoolie brush, both for $3. Their booth was absolutely packed, so I got in and out as quickly as I could.

Finally, I got a Beauty Blender + Solid Cleanser pack. The discount I got on this was absolutely crazy. Online, this pack retails for $32.95, but at the show, I got it for only $15.99! Of course, I used it as soon as I possibly could, so it's currently in my bathroom drying.


China Glaze, one of my favorite nail polish brands of all time, had the most amazing deals. The one I took advantage of was the 6 for $15 deal, which is insane, considering China Glaze polishes are usually $6 a pop! 

From left to right: "Black Diamond," a gorgeous dark slate gray color with a light shimmer; "Up All Night," which is like a cross between a deep navy and an electric blue; "Four Leaf Clover," a creamy, blue-based green that is right up my alley; "At Vase Value," almost a dupe for Essie's "Mint Candy Apple," although just a tad greener, and is the perfect minty blue-green color; "Sneaker Head," a vivid cross between a neon pink and a bright red; and finally, "Passion For Petals," a gorgeous dusty rose color. 

With the 6 for $15 deal, I got to choose between a top coat and a base coat, in which I chose the Strong Adhesion Base Coat. The lady was also super sweet and threw in their Matte Magic top coat!


Next, from Lime Crime, I got one of their opaque lipsticks and one of their Velvetine lip colors. Initially, when I saw the Velvetine lip color in "Salem," I thought "Why would anyone buy a brown like this?" But then the woman at the counter layered it with the opaque lipstick in "Poisonberry," and it created the most incredible oxblood color that I know I will be wearing nonstop this fall! Their opaque lipsticks were $16 as opposed to the original price of $18, while their Velvetines were full price.


I noticed the Model in a Bottle booth and had to stock up. They recently repackaged their product, and I much prefer this packaging. I always get the Sensitive Skin Formula, because there is less fragrance in this formula. This stuff is great because it really helps to keep your makeup in place! I believe their show price was around $15, as opposed to the full price of $21. 


From Anastasia Beverly Hills, I got two products. The Anastasia Clear Brow Gel, which is a repurchase, for $14, and the ever-so-coveted Contour Kit, with which I am absolutely OBSESSED. I used it for the first time in a tutorial that will be up later this week, and it works some serious magic! I am just so obsessed with this that I'm thinking about purchasing a second one and doing a giveaway. Let me know if you think I should in the comments below!


Finally (well, actually, it was the first booth I went to), I picked up 10 shadows and 4 pigments from Makeup Geek. Their prices were the same at the show as they were online, but of course, you actually got to swatch them and really get a feel for them before purchasing! Marlena's team is so sweet and she is without a doubt one of the sweetest people I have ever met.

From left to right: "Corrupt," the blackest black shadow I have ever had the opportunity to swatch. Seriously. You have to have this in your collection. "Envy," a gorgeous, deep blue-green color with some sparkle; "Sea Mist," essentially the lighter version of "Envy," but with less blue; "Simply Marlena," a super bright matte pink with just a hint of glitter. One of the less-creamy shades in the collection, but it makes up for it in pigmentation; "Cosmopolitan," a beautiful coppery shade that is one of the creamiest shadows I have ever touched; "Unexpected," a perfect taupey brown color that is fantastic for really defining the crease; "Cinderella," a very light, shimmering pearly pink that I couldn't resist getting despite having a million different shadows in my collection that look like this; "Beaches and Cream," a matte warm nude color that is fantastic for a brow highlight and probably the creamiest matte shade I have ever swatched; "Shimma Shimma," a frosty champagne color that looks absolutely stunning on the inner corner; and "Rockstar," a super shimmery silver shade that stays very neutral rather than blue, like many silvers tend to lean. 

These shadows are worth all the hype. That's all I have to say. I am going to do a full in-depth review with swatches and everything, but seriously, these are worth every penny, with quality that competes with the best and prices that are totally comparable to drugstore! 

The pigments: "Liquid Gold,"  the most insanely metallic and pigmented gold color I have ever seen, it runs a little bit olivey rather than yellow, which in my opinion makes it a bit more flattering than most golds; "Insomnia," this crazy cool color that I wish I knew how to describe is kind of brown but kind of teal but kind of blue and all kinds of unique that will guarantee you'll be asked, "What eyeshadow are you wearing?"; "Vegas Lights," another copper (because I love copper, what can I say), that is insanely metallic and smooth; and "Sweet Dreams," a pinky beige color with a satin finish that would be amazing as a brow highlight. 

And that's everything! I feel like I've been rambling on forever, but there were so many great deals at PHAMExpo that I couldn't resist so many of these items. Luckily, I told my boyfriend the most I was willing to spend for the entire day, and he kept the money safe in his wallet so I wouldn't start spending like a madwoman (even though you would think I did anyways)! 

- D.