menu

Wednesday, March 2, 2016

Australian Care Package with Diary of a Beauty Padawan!

Early in my blogging days (like, way back when I did my Hunger Games posts), I had this lovely Australian reader named Shae. Little did I know at the time that Shae would become a great friend of mine, and then go to create her own blog, Diary of a Beauty Padawan! While she and I have both been incredibly busy due to our college schedules, we still occasionally like to freak out and fan girl over the newest beauty products, and some country-specific brands that we love!

This isn't necessarily a beauty swap, like our last post together was, but more of a care package from her to me, filled with all kinds of Australian makeup goodies! I thought I'd type up a post giving you my first impressions of the fun things she sent me.


The first thing that caught my eye was the Sunset palette by Chi Chi. Chi Chi is known for having gorgeously pigmented, affordable eyeshadow palettes, and this is now the second one I own! The first one was the Chi Chi Brights palette she also sent me a while back. When she asked which one I wanted and gave me the choice between two, I'm pretty sure my exact words to her were "The Sunset one speaks to me on a personal level." And it is even more stunning in person!


The eyeliner she sent me was kind of a joke, because of the name, but it is truly a gorgeous purple liner -- which is perfect for my hazel eyes. This specific eyeliner, appropriately named "Beauty School Dropout," was sold in a limited edition set, and unfortunately is no longer sold. Hopefully they'll come out with it permanently though, because this color is gorgeous!


The next bunch of eye products she sent my way were from a few different brands. The black liner on the left is by Model Co, and is called the Eye Define Crayon Liner. While, yes, it is just a basic twist-up black liner, the coolest part about it is that it comes with a built-in sharpener! Never will you be condemned to a dull line with this liner, because the sharpener pops right into the cap. The swatch for this has been included with the Chi Chi liner above.

The Face of Australia Colour Max "Gold Mine" quad is a simple little neutral quad that is just perfect to throw in your bag and go. It's got 4 neutral shades ranging from light to dark, and is easily blendable! These shadows aren't crazy pigmented, but if you're on the go, you might want the forgiveness that these shadows give. 

Lastly for the eyes are these two neutral cream shadows by Australis. But don't be fooled into thinking they're just ordinary cream shadows. These cream shadows pack a serious punch, and are super metallic! I was actually really surprised when I dipped my finger in them, because I wasn't expecting a cream product. But as soon as I swatched them, I knew they were magic. 


Now moving onto my favorite part -- the lips! The two on the left took me by surprise, because they look like the cult favorite Lip Butters by Revlon, but they're in blue and silver! While it looks like Revlon Lip Butters have been discontinued in Australia, we can still get them here in the United States, but not in these blue and silver shades. Fortunately (or unfortunately, depends on how you look at it), these two shades don't come off as opaque as some of the Revlon Lip Butters often do, but rather are more of a sheer, shimmery formula, that I didn't bother swatching because it really doesn't pick up as much of a color. 

The Face of Australia Lip Paints are very intense (but somewhat messy) liquid lipsticks. You really need very little product to apply these, which I totally forgot when I went to swatch them, which resulted in messy swatches. I think these have been discontinued, though, as I can't find them on the FOA website. However, I love the pigmentation and shine of these lip paints, and they stain your lips, so even when they wear off, you're still left with some color!


And onto the last few products! The first product is by a brand called Boe Beauty, and this particular lip gloss is no longer sold on their website. But I can tell you that it smells like peaches! It is relatively glittery though, and a little bit grainy, but if you can get past that, it smells really, really good and makes your lips look super plump! 

Next are the Velourlips Matte Lip Creams by Australis in "Grandmaster Pash" and "Los Angel-es." "Grandmaster Pash" is part of their AC❤ME collection, which is really interesting because, while the product is matte, it also has like a metallic sheen. It's kind of hard to describe, and something you may just have to experience for yourself! In terms of color, it's a super wearable brick red shade. "Los Angel-es" is a super bright bubble gum pink, not for the faint of heart! I'm not sure if I'll ever be able to pull this color off (but you know I'll try), but I don't have anything like this in my collection! 

Also from Australis are the Colour Inject Lip Gloss and the Cray For Colour Lip Gloss Crayon. I didn't swatch the Colour Inject Lip Gloss because it is very sheer, with just a very subtle hint of color, but the Lip Gloss Crayon is super pigmented but still hydrating! The shade she got me is called "Twisting Roses," and is an orangey red shade that is super fun for spring.


That's all for this post! I'm hoping to get a tutorial up using a few of these products soon. Is there anything you'd like to try? Anything you want to see a tutorial for? Let me know in the comments below!

Again, a HUGE thank you to Shae for sending me all these products! Go over to her blog and send her some love for me!

- D. 

Monday, February 1, 2016

REVIEW: ColourPop Super Shock Cheek in "Lunch Money"

I'm gonna come right out and say it: I have a new favorite highlighter, as well as a new obsession. I recently purchased the ColourPop highlighter in "Lunch Money," and I can't say enough good things about it. The second I touched this product to swatch it, I knew I was going to want more products from ColourPop to add to my collection.

That being said, let's get down to the nitty gritty of this product!


So this color, "Lunch Money" is described as a" soft light gold with a reflective golden duo chrome finish." While I'm not really sure I see the duo chrome once it's on my skin, I definitely can see it as a soft light gold, although leaning more toward a champagne, since it's not super warm toned.


While I'm not a huge fan of the packaging, I understand why it needs to be packaged this way. The texture of this is basically magical. It's got this creamy texture that is somehow actually a powder. I guess I'd almost call it like a mousse. Honestly, there is no good way to describe it, you seriously just have to touch it. It's cool to the touch, and when you put it on your face it's instant magic. Because of this magical texture, though, it has to be in packaging that can seal tightly, which unfortunately means ColourPop probably won't be coming out with palettes any time soon.

Personally, I prefer to apply this with my finger tips, just because I feel like I get a more intense glow that way (and since my skin is so pale, anything less than intense just won't show up), however, they also recommend either a flat synthetic cheek brush or a duofiber brush, depending on your desired finish. If you have darker skin than me, you can probably go for either of those and be just fine -- it just isn't intense enough for me if I use it that way.


That is one swipe from my fingertips. Just one. You barely have to dip your fingers or brush into the product to get fantastic pigmentation, and this stuff seriously stays put all day! I think my favorite thing about this highlighter is that it isn't glittery or chunky, and it doesn't make you look sweaty or oily. It just gives such a natural pop to the skin. 

I hope that you enjoyed this quick review!

- D. 

Thursday, January 14, 2016

REVIEW: L'Oreal True Match Lumi Cushion Foundation

I know, I know, it's been forever, I'm the worst blogger ever. My fall semester was absolutely nuts, and because of that, I just couldn't find time to blog! I decided I was going to take a break for a bit so I wouldn't be so swamped with homework and also be worrying about school work and what not, however, I am hoping to be able to get back to it this semester. Forgive me if I'm rusty!

Anyways, for my first few posts of the New Year, I have some reviews to do for you guys! The L'Oreal True Match Lumi Cushion Foundation is all over YouTube right now, and I really wanted to give it a try.

I remember when I was younger, my mom had an Asian beauty brand cushion foundation that I loved playing with, so seeing cushion foundations in American drugstores really take me back to my childhood. That being said, cushion foundations originated within Asian beauty brands, and, especially with the recent interest in Asian beauty products, have become more popular in the US. It's kind of like how BB creams took the world by storm a few years back. A widely popular product in Asia made its way west!


Anyways, let's get on to the review. First thing I noticed about this product right off the bat was the packaging. It's this gorgeous rose gold compact that easily draws you into the display. When you get to the display, there are these little stickers that are supposed to help you find your shade. Personally, I didn't find those particularly helpful, but it was nice that they tried. Normally with the L'Oreal True Match Foundation, I wear the shade C2. However, within the True Match Lumi line, the lightest they go to in each of the shade ranges is C3, N2, and W2. For those of you who aren't familiar with the True Match line, each shade range is categorized by your undertone (C for cool, N for neutral, and W for warm). In the Cushion Foundation, I chose to go with N2, because I have kind of a cool-neutral skin tone.

Something super important to note is that the shade range of the True Match Lumi line is definitely not as vast as the shade range in the original True Match line. The original True Match line has 28, Lumi only has 12.

When you open up the foundation, it is just as all cushion foundations are. You open it, the sponge is sitting on top of a little cap, and when you open the cap, you see the foundation-soaked sponge. To apply, you just press the sponge into the cushion, then tap it on your skin!


While we're on the topic of packaging, I feel the need to make note that the sponge gets VERY dirty, very fast. While it is easily washed, it stains pretty badly. So your sponge will never look as immaculate as it does when you first open it.

My first thought when I opened this foundation was that it was pretty orange for a "neutral" toned foundation. But I still wanted to give it a shot. When you first apply this foundation, you'll notice it is very thin and almost watery. However, this foundation really lends itself well to the patting motion that is recommended. It's definitely a sheer-to-medium coverage, but you can build it up to medium pretty quickly. When the foundation is applied, it's definitely very luminous, if not a bit slippery. For me, with my dry-combo skin, this is ideal! At first I wasn't sure how I felt about the finish, but after wearing it throughout the day, I noticed something with this foundation that is always a major struggle for me: it didn't cling to my dry patches. Like at all. And it lasted pretty much all day!

Here's the struggle for me. I'm pale. Pasty even. Not only did this shade look orange in the packaging, but when I brought it down my neck to attempt to blend it out better, it definitely came off just slightly dark enough to show up as orange. To resolve the problem, I went back in with my Beauty Blender and kind of dealt with the situation. The problem here for me is that the shade range just isn't a vast as the shade range of the original True Match line. I'm simply too pale for this foundation (shout out to all my pasty girls out there).


Maybe in the summer I could pull this shade off. I mean, it isn't THAT dark on me, so I think with a tan I might be able to wear it. However, I paid $16.99 for this foundation. That's right. $16.99 for a drugstore foundation. Oh, and it only comes with 0.51 fl oz! The standard foundation size is about 1 oz, so you're paying a big chunk of money (for a drugstore foundation), for half the product. You're definitely paying for the packaging here.

Final Thoughts? For mid-range skin tones with dry to dry-combo skin, who wants the ease and portability of a compact liquid foundation? This stuff would probably be great. However, I personally can't forgive the shade range. If you're super fair, or even just a dark-medium skin tone, you're out of luck with this one. I also can't forgive the price. While I have no problem shelling out $45 on a good luxury foundation, I expect to get at least an ounce of product in my foundation. With this, I expect it to run out quickly and have a person running out to the store to buy more.

I'm not entirely sure how I feel about this foundation. I've been using it for about a week, on both bad skin and good skin days. I think my biggest beef with it is the shade range. Honestly, if the shade range was better, I could justify the price tag, due to the ease of application, the kind of coverage that gives you the "I woke up like this" look, and the fact that it doesn't cling to any dry spots.

Hope you enjoyed this review! I'm definitely rusty since it's been a while, but I hope to be back into the swing of things soon!

- D.

Sunday, September 27, 2015

Hometown Hunt: San Diego

Hello! It's been ages, I know, and I apologize. I have so many posts lined up but I haven't had the chance to do any of them because school has been keeping me incredibly busy! Maybe I'll upload some photos of the crazy projects I've been working on, but in the meantime, I'm here to bring you some of my homesick blues with this fun post about some of my favorite places in my hometown. Unfortunately, since I'm not home to take pictures of these places, I'm using pictures that I have of these places that are either on Instagram or on my phone!

Of course, I'm a San Diegan currently living in North Carolina, and let me tell you, there's nothing I miss more than some good food. One of my favorite places to go is this cute little family-owned pho restaurant in Chula Vista (although they also have a location on Convoy) called Pho Convoy Noodle House. Their food is absolutely amazing, and it's one of those places I seriously miss when I'm so far away. The staff is incredibly sweet, and they even know Andrew and me! In fact, when I left for college, some of the waitstaff asked Andrew where I had been.


Another amazing place in San Diego that I absolutely adore is the theater I had the opportunity to work at this summer! Of course, I don't think it's amazing simply because I worked there. It's a truly incredible and groundbreaking theater, only a couple miles from the beach! That place is the La Jolla Playhouse. Located in the theatre district at UC San Diego, the La Jolla Playhouse works directly with the theatre school at UCSD, and is known for working on upcoming musicals that sometimes even make it to Broadway -- like Jersey Boys for example. It got its start at the La Jolla Playhouse!


Sometimes, you can find tickets for the La Jolla Playhouse on Eventbrite, or if you have tickets for your own event, you can sell them there! The fun thing about Eventbrite is that it gives you the option to search for events in your area, so if you're ever on the hunt for something fun to do on a Friday night -- including free events -- check out Eventbrite! 

This is seriously such a bout of homesicknesses for me. I've been back in North Carolina for a little more than a month now, and I have a countdown on my phone that lets me know how soon I can come home. It's been so rainy and dreary here. I'm ready to come home to the California sunshine!

What are some fun venues or restaurants in your area that you love? Let me know in the comments below!

- D. 
 
This post has been done in partnership and inspired by Eventbrite. All opinions and photos are my own. 


Thursday, August 27, 2015

Throwback Thursday: My Makeup Evolution

Alright, so this post has potential to be a dangerous one...because I'm going to be discussing my makeup evolution, from 8th grade when I first started wearing makeup, to now, and how my skills and techniques have grown over the years.

Lemme give you a fair warning: I was a dopey kid. Like seriously. Really freaking dopey.

We'll start out when I was in 8th grade. It was when I was still really trying to find myself. All the way through 6th grade, I was a total tomboy, and I went to a tiny private school. 7th grade was the first time I went to a large public school, and 8th grade was when I finally started wearing makeup. I started wearing makeup because I was coming out of the 2006 emo phase. Luckily, mine wasn't too bad, but I did attempt to rock black eyeliner and some curtainy side bangs...


When I first started wearing makeup, my routine was very, very simple. I would smudge my CoverGirl Perfect Point Plus on my lower lashline, throw on a coat or two of the Maybelline Great Lash Mascara (because let's be real...who didn't own this mascara at one point in time?), and buff the Physician's Formula Talc-Free Mineral Powder all over my face. To this day, I continue to ask myself why in the world I ever thought this was a good look.

After this, I went into high school. My freshman year, I had a really solid group of friends and it was definitely one of my better years in high school. My makeup situation got a bit better, but this was also when I discovered liquid liner...and the struggle that comes with it.


Whenever I see these photos, I'm still shocked at just how thin I was. At this time, I was medically underweight, although I ate plenty of junk and did very little physical activity aside from walking. This was the year that I started out wearing the L'Oreal HiP Color Chrome Eyeliner in black on my upper lash line, and for the life of me I couldn't figure out how to prevent it from transferring onto my brow bone throughout the day. I then switched from the L'Oreal liner to the Wet n Wild H2O Proof Liquid Liner, which I still swear by today. I also graduated from wearing a mineral powder to wearing a liquid foundation, which was the Almay Truly Lasting Color foundation. I think I continued wearing the Maybelline Great Lash Mascara through this year as well.

Then my sophomore year happened. I actually choose not to remember much from my sophomore year, simply because it wasn't a very good year. I struggled a lot with my confidence this year, and it was a big year of firsts. This was the year I had my first major breakup, as well as my first year in drama and colorguard -- I even got asked to prom that year.


Someone should have taken my tweezers away from me. This year, an upperclassman in drama introduced me to the Maybelline Ultra Liner Liquid Liner. This was a really great product that I ended up using for years after that, and this was also the first year I attempted a winged liner, for prom. I have no idea what brand of eyeshadow I used for my look that night, and probably for good reason. I don't know why anyone let me leave the house looking like this. Thanks, mom.

My junior year was a bit of a golden age for me. I had solid friends, I had found my place in my drama department, I was captain of my colorguard, and I was starting to really learn how to do my makeup. At this point, the eyebrows continued getting thinner, and kind of started to look a lot like commas.


Look at that improvement! This was the year that my boyfriend at the time bought me the Coastal Scents 88 Palette, and I really started to play with color. I continued using the Almay Truly Lasting Color foundation and the Maybelline Ultra Liner Liquid Liner, but switched up my mascara to the L'Oreal Voluminous Carbon Black Mascara. I also discovered the L'Oreal HiP Color Chrome Eyeliner in "Silver Lightning," which I wore on my lower waterline to brighten up my eyes, and the Wet n Wild Color Icon Blusher in "Mellow Wine."

From here, I'm gonna skip over my senior year, because I was incredibly lazy that year. I basically stopped wearing makeup altogether, aside from blush to make me look more awake. I had major senioritis. We're gonna skip right on over to when I was in beauty school!


This was when my makeup hoarding began to get a little bit intense, and I got really good at winged liner. Honestly, I can't even tell you what products I was using the most of at the time because I was constantly switching back and forth between products. I can definitely say, though, that I improved a LOT over the years, and I had drama and colorguard to really thank for that, since I had to do makeup that was consistently out of my comfort zone in order to perform.

And now we've reached today, in which photos of me today are all over this blog already. My skills in makeup have improved immensely sine I was 13, and the magic of puberty and braces seriously did me well.

I hope you found this post as fun as I did! Trust me, as I was going through my external hard drive, looking for pictures to post, there were so many cringeworthy photos I chose not to use. I was laughing so hard while looking through all of those photos!

Do you have any embarrassing photos from when you were young? Any makeup faux pas you're willing to share? If you're brave enough, feel free to post them in the comments below!

- D.

Wednesday, August 19, 2015

Venice Beach

It's 2 in the morning as I type from a hotel room in West Virginia. It's also about 90% humidity outside and I've been procrastinating typing up this post for at least a week now because I am lazy. I'm on my way back to North Carolina for the school year (sob), and have been traveling for a little less than a week now, having stopped in Indiana to visit with my dad's side of the family, and I'll be back in my apartment on Thursday! Needless to say, I'm pretty excited about getting back into the swing of things and having a space to myself again.

Anyways, I promised this look a while back, and I actually photographed this look on the same day that I wrote my review on the Wet n Wild Venice Beach palettes, which are the palettes I used to create this look.


In order to ensure the richest color payoff, I started out with my NYX Jumbo Eye Pencil in "Milk." I applied this base in a thin layer, keeping below my crease. Then, with a fluffy brush, I used Milani Bella Eyes Gel Shadow in "Bella Caffe," and buffed it gently into the crease, to help assist in blending later on. I used a small paddle brush and patted the vibrant yellow (from either the "Hemporary Solutions" or "Boardwalk Boozing" palettes -- they're the exact same color) along the inner corner of my eye. On the center of the lid, I used the bright pink shade (again, from either palette). To blend the yellow and pink seamlessly together, I took a mix of the yellow and the vibrant red-orange from "Hemporary Solutions" and used a sideways patting motion to blend the shades together. On the outer corner, I first started out using the vibrant cobalt blue shade from the "Boardwalk Boozing" palette. I patted that all along the outer third of the eye. Then, deciding that I wanted to deepen up the outer corner, I added in some of the vibrant shimmery purple, using a pencil brush, carefully sweeping this into the crease as well. To help further blend the crease, I went back in with a clean blending brush and continued blending until I reached the desired effect. For my brow highlight, I used the matte white shade from "Hemporary Solutions."


Along the lower lashline, I wanted a bronze base to pair with the aqua color from the "Hemporary Solutions" palette, so I used my Urban Decay 24/7 Eyeshadow Pencil in "Juju" on my lower waterline and lower lash line. They no longer sell these shadow pencils, but they're basically just the chubby stick version of the Urban Decay 24/7 Eye Pencils, and this specific one is very similar to "Hustle," or, if you're on a budget, you can get a similar shadow pencil from Milani, in the shade "Brown Deluxe." After laying down the shadow pencil, I used the aqua color out the outer half of the lower lash line and smudged it out. On my upper lash line, I did a simple winged liner, using the Sephora 24 HR Waterproof Liquid Liner. Apparently I'm the worst though because I didn't realize that this specific shade has been discontinued as well! This particular shade is almost identical to Urban Decay's "Retrograde" liquid liner. To help hide the band of my false lashes, I used the Lorac Front of the Line PRO liquid liner just along the base of my upper lashes, which were the Andrea Lashes #53.


For my cheeks, I decided to go with a subtle bit of color and a high shine highlight. As a subtle contour, I used the Anastasia Contour shade in "Fawn." For blush, I used my trusty Maybelline Fit Me Blush in "Light Rose," and for my highlight, I used the Makeup Geek shadow in "Shimma Shimma."


On my lips, I chose to go with a soft, neutral pink. I first laid down the NARS Lip Pencil in "Rikugien," then topped it off with the Burts Bees Lip Shine in "Blush."


That's it for this look! This look was a lot easier than it looks, especially since these Wet n Wild palettes are so creamy and blendable. Don't forget to check out the review I did on them a few weeks ago!

- D.


Wednesday, August 12, 2015

What I Wore: "Up Here" Opening Night

I know I promised a fun, bright look in my last post, but I couldn't resist posting this first! This past Sunday, I had the privilege of going to see Up Here, the new musical that I've been working on all summer at my internship. It was opening night, so there was a big opening night party after the show, where I got to say one last goodbye to all the amazing people I got to meet and work with this summer. I decided to write up a post about what I wore to the world premiere of Up Here, as well as the after party!


The dress I wore was a black backless skater dress, with a laser cut neckline and leather detailing. I bought this dress a couple years back to wear for mine and Andrew's first anniversary, and I never get the chance to wear it, so I thought this would be the perfect time to break it back out! I got it from Unique Vintage, but like I said, it was about two years ago that I bought this, so it's sold out. However, black skater dresses are pretty easy to find just about anywhere! The most similar dress I could find online is this one from Macy's.


Something I really love about this dress is the way it fits and the way it shows off my back. It makes me feel so cute and sexy! Of course, the tricky thing about backless dresses is wearing a bra. Since I'm a little too busty to go braless, I always opt for a good old sticky bra to help me out in these situations. I got the one I wore here from Amazon. Not the most comfortable thing in the world, but it gets the job done and is great for nighttime events when you're not getting too sweaty. 


For my bag, I went with this cute mint bow clutch from Target. I also wore these simple rhinestone studs from Forever21, and my bracelet was a simple studded bar bracelet that I got last summer, also at Forever21. On my nails, I wore the Revlon Nail Enamel in "Vixen," and for my shoes, I decided to go with a classic black platform pump by Jessica Simpson.

Shop the Outfit:
Black Skater Dress (unavailable; similar here) :: Backless Sticky Bra

I didn't get the chance to take a picture of my makeup since Andrew and I were running a bit late, but I went for a really simple brown smokey eye with a winged liner using my handy Too Faced Chocolate Bar Palette and the Lorac Front of the Line Pro Liner, with Milani's Luminoso on my cheeks, Makeup Geek's "Shimma Shimma" as a highlighter, and Milani "Plumrose" on my lips! 

That's it for today's post! What would you wear to an event like this? Let me know in the comments!

- D. 

Thursday, August 6, 2015

REVIEW: Wet n Wild Summer 2015 Collection -- Venice Beach

I was just casually walking through my local Rite Aid as I do, and I spotted the most gorgeous colorful collection of eyeshadows. Of course, it had to be the new Wet n Wild summer collection! It was absolutely gorgeous, and 40% off, so I had to snag two of the three palettes to try them out!


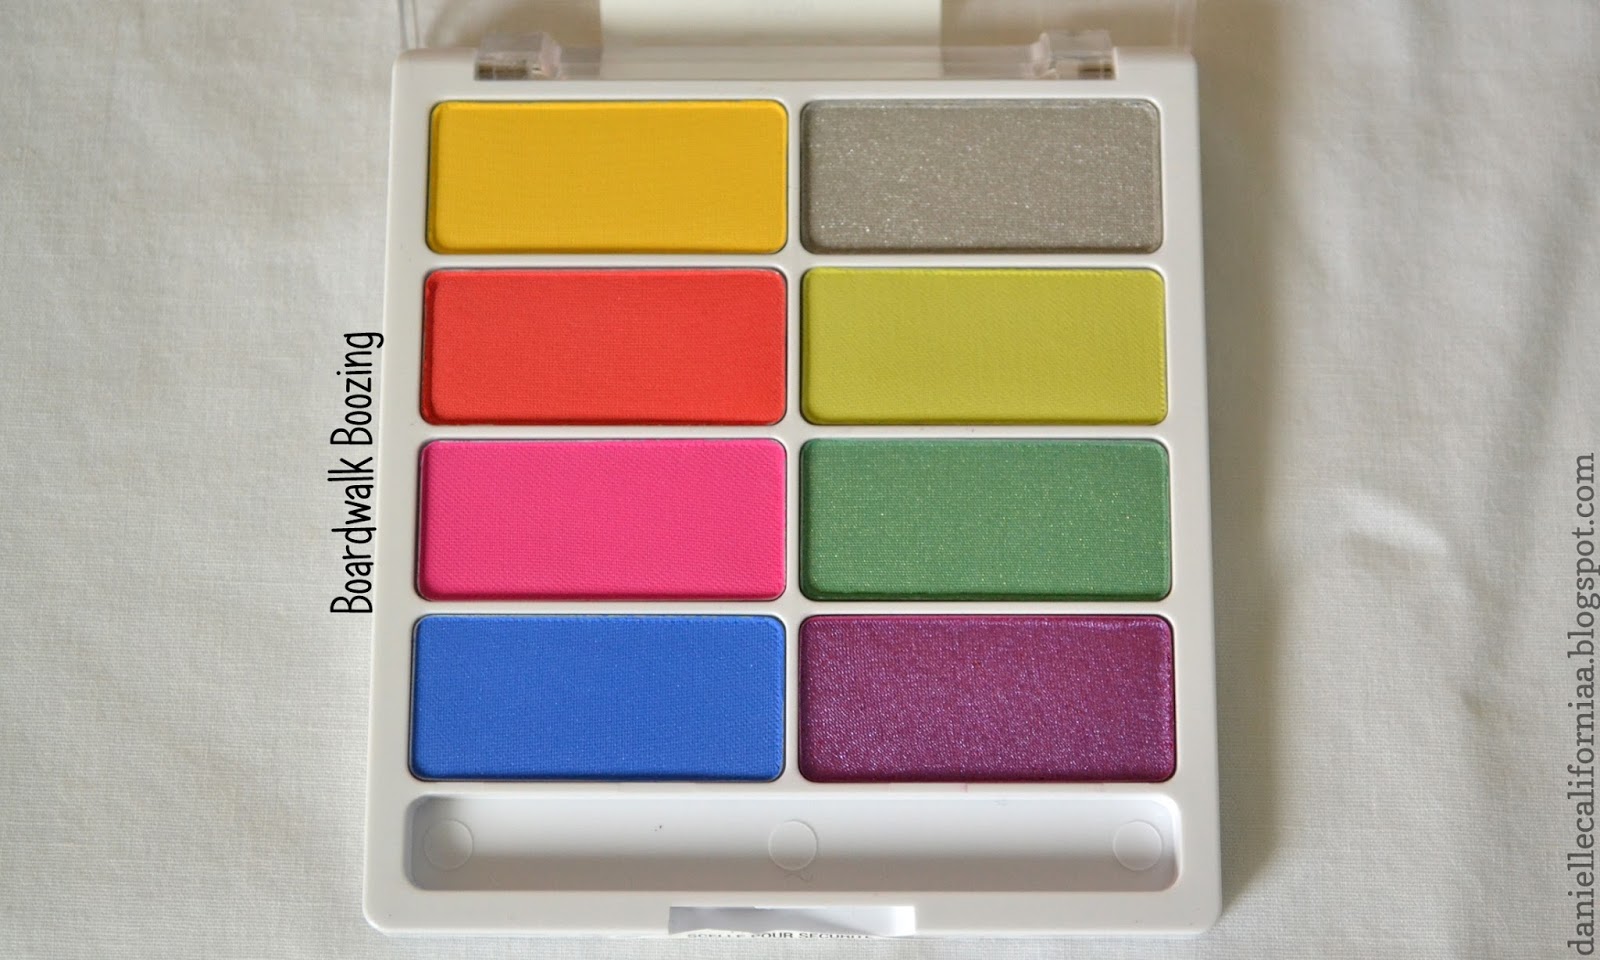
Incredibly colors, right? Normally when I see palettes like this in the drugstore, I assume that they're going to be chalky and sheer. Since they were 40% off though, I decided I could take a chance. I chose the palettes "Hemporary Solutions" and "Boardwalk Boozing," and didn't grab the palette "High Flying Colors," because it just reminded me too much of Mimi from The Drew Carey Show. These palettes are honestly quite reminiscent of the old watercolor palettes that I used to use as a kid. Anyways, let's get into the review!


The first palette, "Hemporary Solutions," has 4 cool toned colors, 3 warm toned colors, plus a true, matte white. When swatched with fingers, these eyeshadows are super soft, and almost crumble at the touch. They are incredibly creamy, despite being a little too soft, and when applied with a brush, creates a super opaque, vivid eyeshadow look. My favorite shade of this palette has to be, without a doubt, the pearlescent aqua blue! In this palette, 6 out of the 8 shadows are matte, which is quite unique for a collection like this.


The formula of the "Boardwalk Boozing" palette is very similar to that of the "Hemporary Solutions" palette, although I noticed that the shimmery shades in this palette are a bit less opaque than the matte ones, which is actually pretty odd for drugstore shadows. The matte pink, red, and yellow shadows in this palette are identical to the ones in "Hemporary Solutions," while the shimmery green one in "Boardwalk Boozing" is actually quite a bit less pigmented than the shimmery green one in "Hemporary Solutions."

Final Thoughts? If you love color as much as I do, these palettes are a must have. Plus, at $4.99 a piece (and you can almost always find them on sale), they're a steal! The pigmentation of these palettes honestly almost rival that of the Urban Decay Electric Palette (which I don't own, but I have played with it quite a few times), which is a crazy claim to make, but they seriously hold their own.

Keep an eye out for my next post, where I put these palettes into action. If you're not convinced that they're amazing, I promise you my next look will sway you!

- D.